A smaller image can mean fewer pixels, fewer bytes or a smaller printed size. Those changes are related, but they are not interchangeable. Choose the requirement before choosing the tool.
- The tested example
- Step 1: Open Resize Image and choose a sizing goal
- Step 2: Load the photograph and check the source dimensions
- Step 3: Request an 800-pixel width with proportions preserved
- Step 4: Apply the dimensions and inspect the finished image
- Check the result
- Troubleshooting
- Background and practical details
- Example sources
TESTED WORKED EXAMPLE
What this session produced
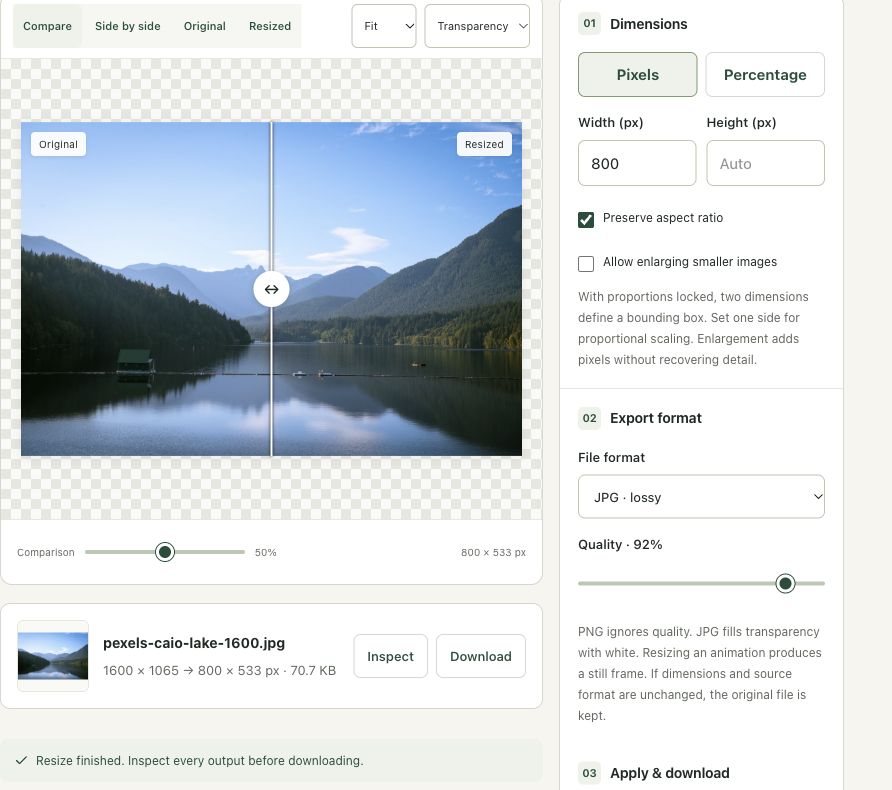
Resizing the lake photograph from 1,600 × 1,065 to a width of 800 produced 800 × 533 pixels. The JPG result was 70.7 KB. The half-height calculation is 532.5, so a whole-pixel output requires rounding.
The screenshots were captured from our working tools on October 6, 2026. Focus workspace is used to give the controls and preview more room. Captures show either the full workspace or the relevant panel; they are not recreated interface illustrations. Sizes and outcomes describe this sample, not a promised result for every image.
Follow the worked example, step by step
Read the settings and the result together. Keep an untouched source when a file is edited, and check the finished output before using it in another application. Each numbered step below includes a real screenshot of the corresponding workspace state. Use the full-size link when a control label is too small on your screen.
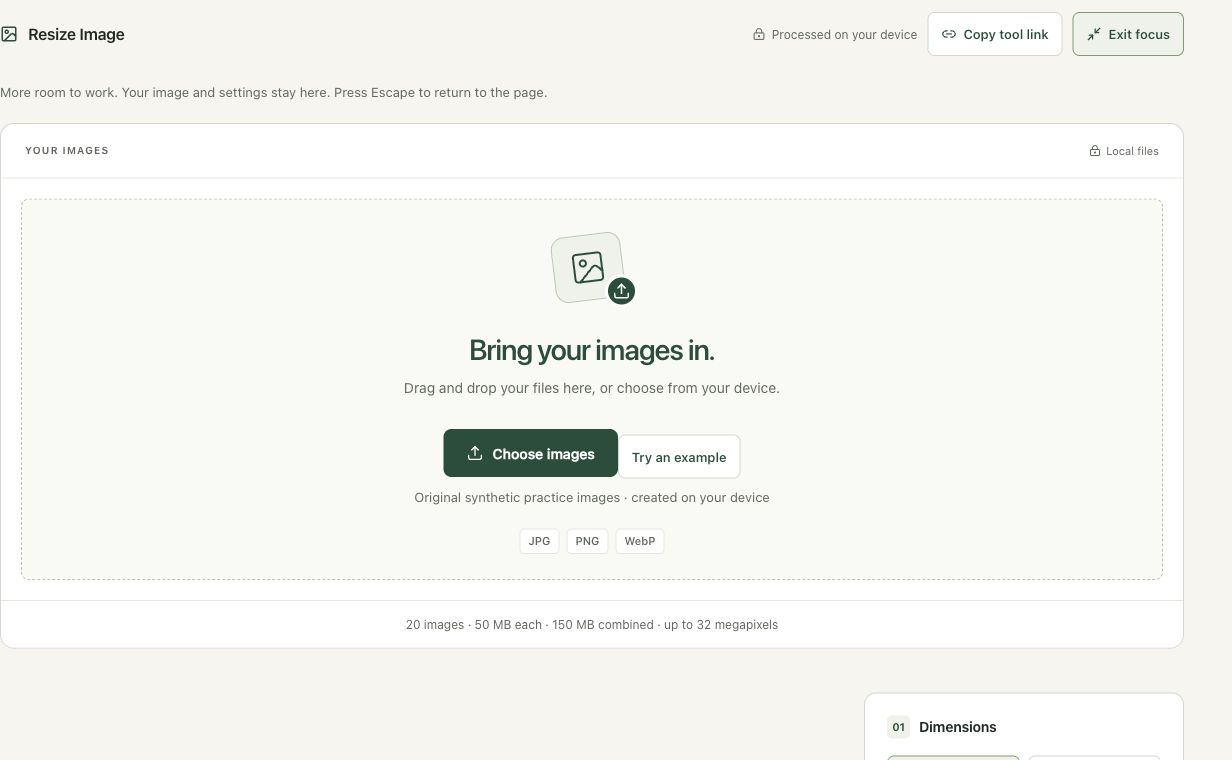
Step 1: Open Resize Image and choose a sizing goal
Open Resize Image. Decide whether the destination requires a maximum width, an exact rectangle or a percentage reduction. A proportional resize is suitable when the original composition should stay intact. It cannot turn a landscape scene into a square without either cropping or adding space. Use this first screen to distinguish those requirements before entering both dimensions.
Step 2: Load the photograph and check the source dimensions
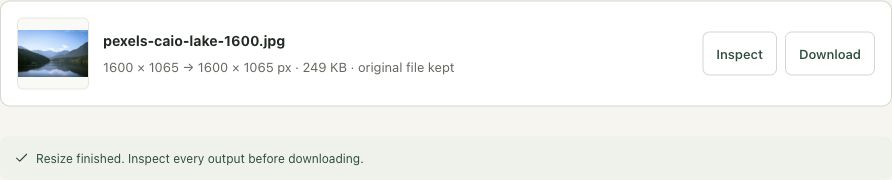
Choose the 1,600 × 1,065 lake JPG. The results list identifies the source and its initial dimensions. With no requested change, the original can be kept. Check that this is the file you intend to resize, especially when several copies have similar names. A thumbnail alone does not tell you whether the source already has enough resolution.
Step 3: Request an 800-pixel width with proportions preserved
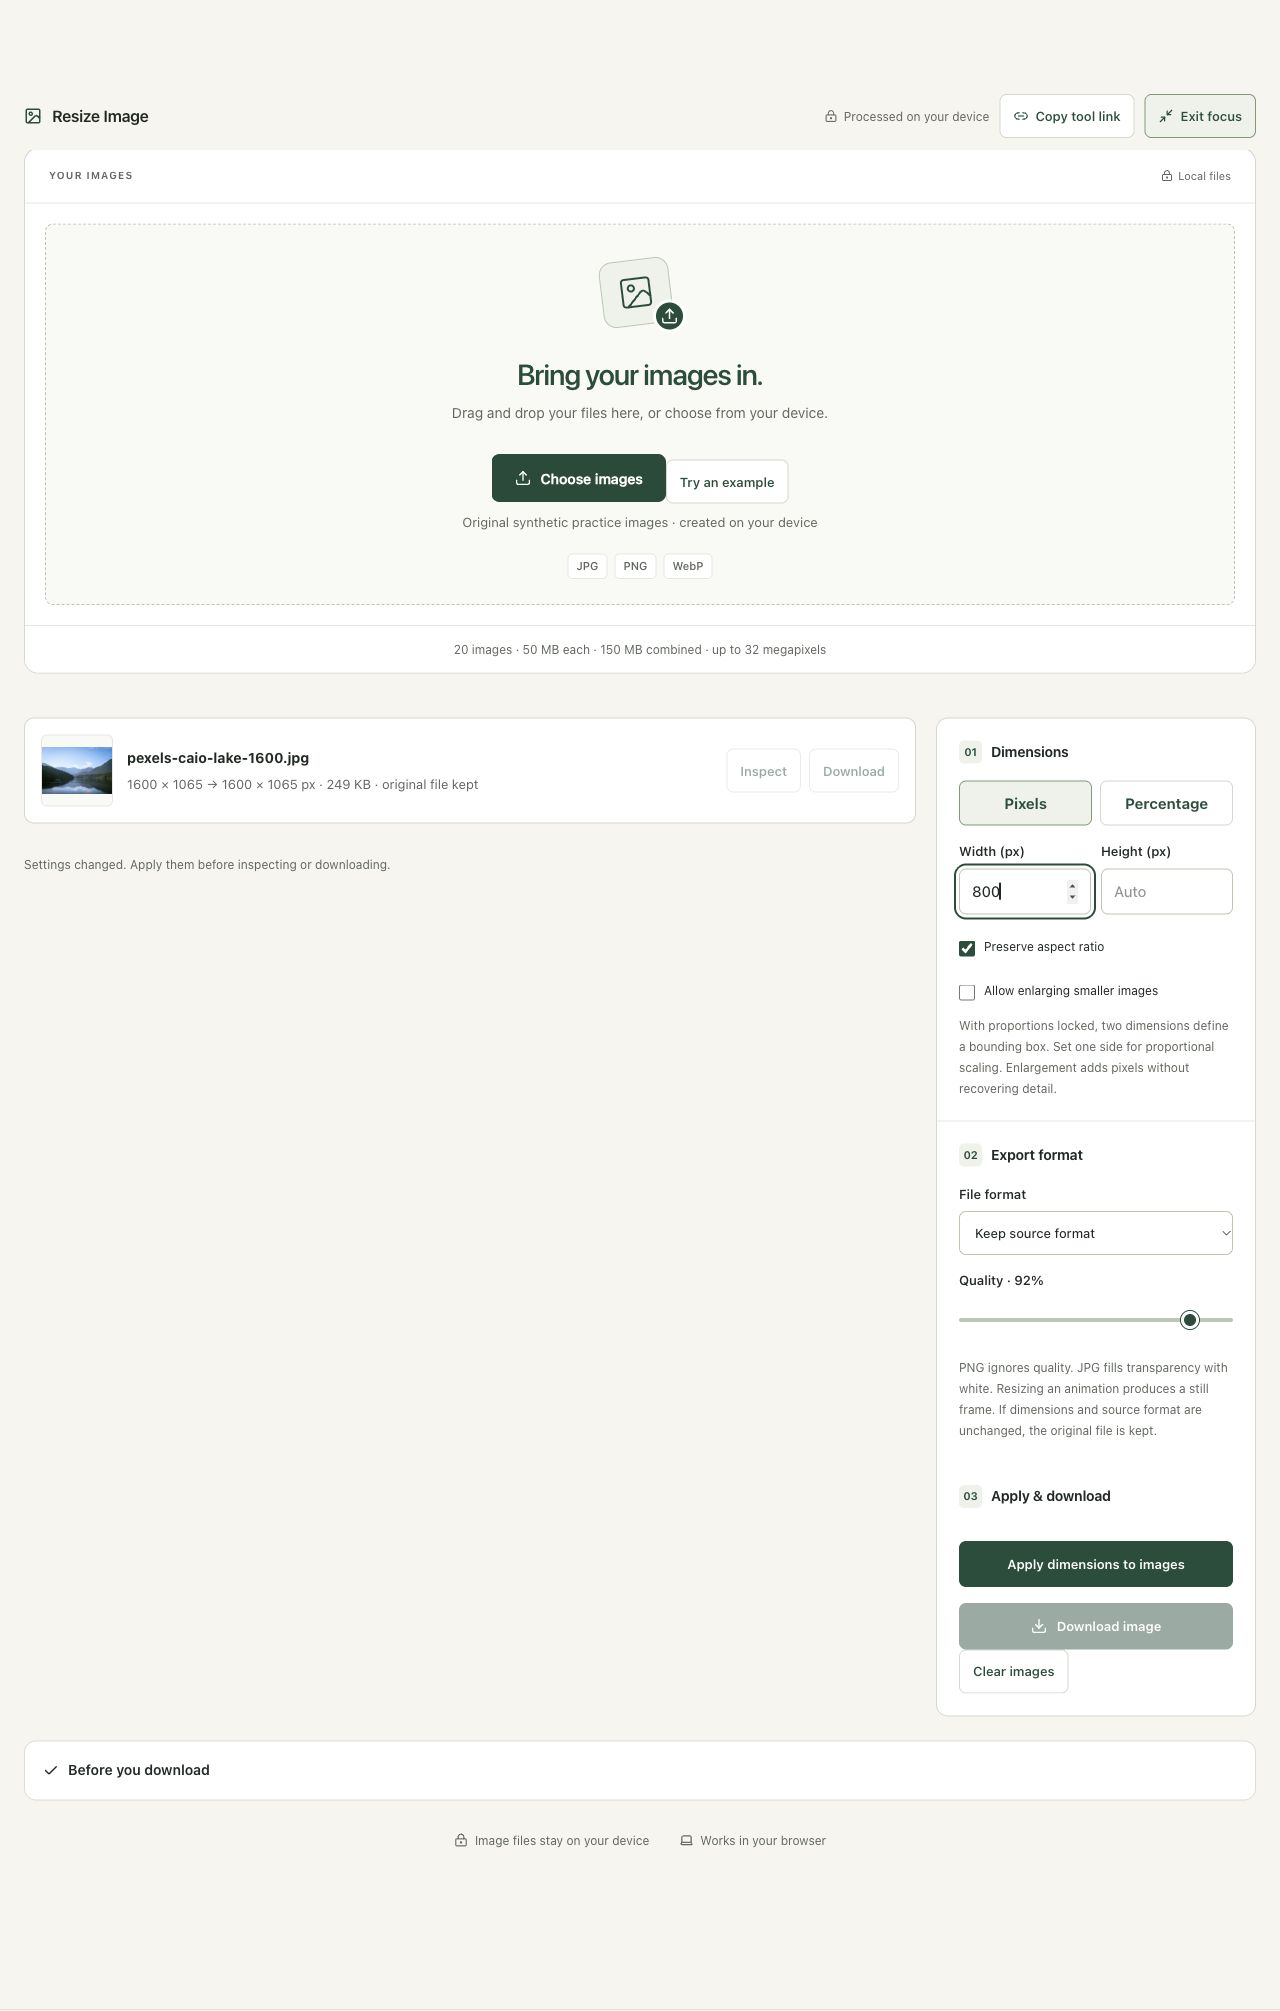
Use Pixels, enter 800 in Width, and leave Preserve aspect ratio checked. In this example the other side is derived from the original proportions. Keep source format selected and leave enlargement disabled. If you enter both width and height, read the bounding-box explanation: a locked resize fits within those values while retaining the source ratio.
Step 4: Apply the dimensions and inspect the finished image
Apply dimensions to images, then use Inspect to open the comparison. The finished file is 800 × 533 and 70.7 KB in this session. The one-pixel rounding is expected. Check the full scene and small details before downloading. A smaller byte count is a result of this particular export; resizing to half the width does not promise the same saving for every image.
Check the result before using it
Check the downloaded dimensions and the shape of the scene. Mountains and the shoreline should keep their proportions. Smaller text or distant objects can disappear at a smaller resolution even when a JPG quality setting is high.
If the result is not what you expected
An unchanged source-format result can retain the original file. Two dimensions with proportions locked act as a bounding box; they do not force a square. Use Crop for a different shape or Social Image Formatter when the entire photograph must fit a fixed canvas.
Background and practical details
Pixels and bytes answer different questions
An image that is 1,800 × 1,200 pixels contains 2,160,000 pixels. Its file size depends on the format, encoder, image content and metadata. Two pictures with those exact dimensions can have very different byte sizes. Resizing changes the grid of pixels. Compression changes how the image is stored; lossless compression can reduce bytes without changing its pixels.
An upload asking for 900 × 600 pixels needs a resizing step. An upload asking for less than 200 KB needs a file-size check. A form asking for both needs both. There is no universal quality slider position that satisfies every combination.
A proportional resizing example
Suppose the original is 1,800 × 1,200 and the required width is 900. The scale is 900 / 1,800 = 0.5. Multiplying both sides gives 900 × 600. Halving each side leaves one quarter of the original pixel count: 540,000 pixels. That does not guarantee a file one quarter as large, because compressed size also depends on encoding.
Two values with proportions locked define a bounding box, not a command to stretch the image. For example, a 1,800 × 1,200 source fitted inside 900 × 900 remains 900 × 600. To fill a square, use Crop Image to choose which content to remove. Unlocking proportions forces different scaling on the axes and can distort faces, products and logos.
Compression is the next decision
Once the dimensions are right, inspect the bytes of the downloaded result. Use Compress to Size if a receiving service imposes a hard limit. Start losslessly. Allow lossy encoding only if the tradeoff is acceptable, and leave additional resizing disabled when the pixel dimensions must remain exact.
Read our upload-limit guide for binary versus decimal KB. Use the actual result status rather than estimating file size from megapixels. A plain diagram can compress very efficiently; a picture with noise and detailed texture often needs more data.
What enlargement can and cannot do
Allow enlarging smaller images is off by default in the resize workspace. Enabling it creates more output pixels through resampling; it does not recover details that were never captured. A larger file can still look soft at actual size. Start from the original high-resolution photo when possible.
The image upscaler is a separate workflow with its own model and limitations. Do not treat generated or interpolated texture as recovered evidence. For a print, calculate the required pixels with Pixels to Print before deciding whether the source is adequate.
Review the downloaded file
Check the output width, height, proportions and format. Inspect small text and straight edges. Smart Image Tools fills transparency with white for JPG exports; PNG keeps decoded transparency. An unchanged-size, unchanged-format resize can keep the original file bytes. A changed size or format is a new encoding. Animated inputs become still frames when a resize is performed.
MDN’s canvas export reference explains browser encoding settings. A density tag such as 96 DPI is separate from pixel dimensions; changing that tag alone does not add detail. Keep the original and name submission copies with their intended dimensions to avoid confusing them later.
Found a different result or an outdated instruction? Send the page URL and a description. Read our editorial policy for how we document methods and limitations.
Example sources and screenshot notes
The example uses a resized 1,600 × 1,065 copy of Lake surrounded by green mountains by Caio.
These photographs are used under the Pexels license. They are licensed images, not claimed as public domain. The photographer links identify the original sources; resizing and example processing were performed for this tutorial.
The controls shown are from the version tested for this guide. A later interface update or a different source can change a result. Compare the displayed format, dimensions and status with the instructions, and report a mismatch with the article URL and the setting involved. Our editorial policy explains how examples and corrections are reviewed.
Find the right tool for your image.
Explore the free workspaces, read their methods and inspect your result before sharing.
Explore image tools