An upload form can reject an image that looks perfectly fine. File size, dimensions and format are three separate requirements. This guide shows how to check each one and make the smallest necessary change.
- The tested example
- Step 1: Open Compress to Size and read the target controls
- Step 2: Load the image and record its starting size
- Step 3: Set 100 KB and explicitly allow quality loss
- Step 4: Compress, compare the result and download
- Check the result
- Troubleshooting
- Background and practical details
- Example sources
TESTED WORKED EXAMPLE
What this session produced
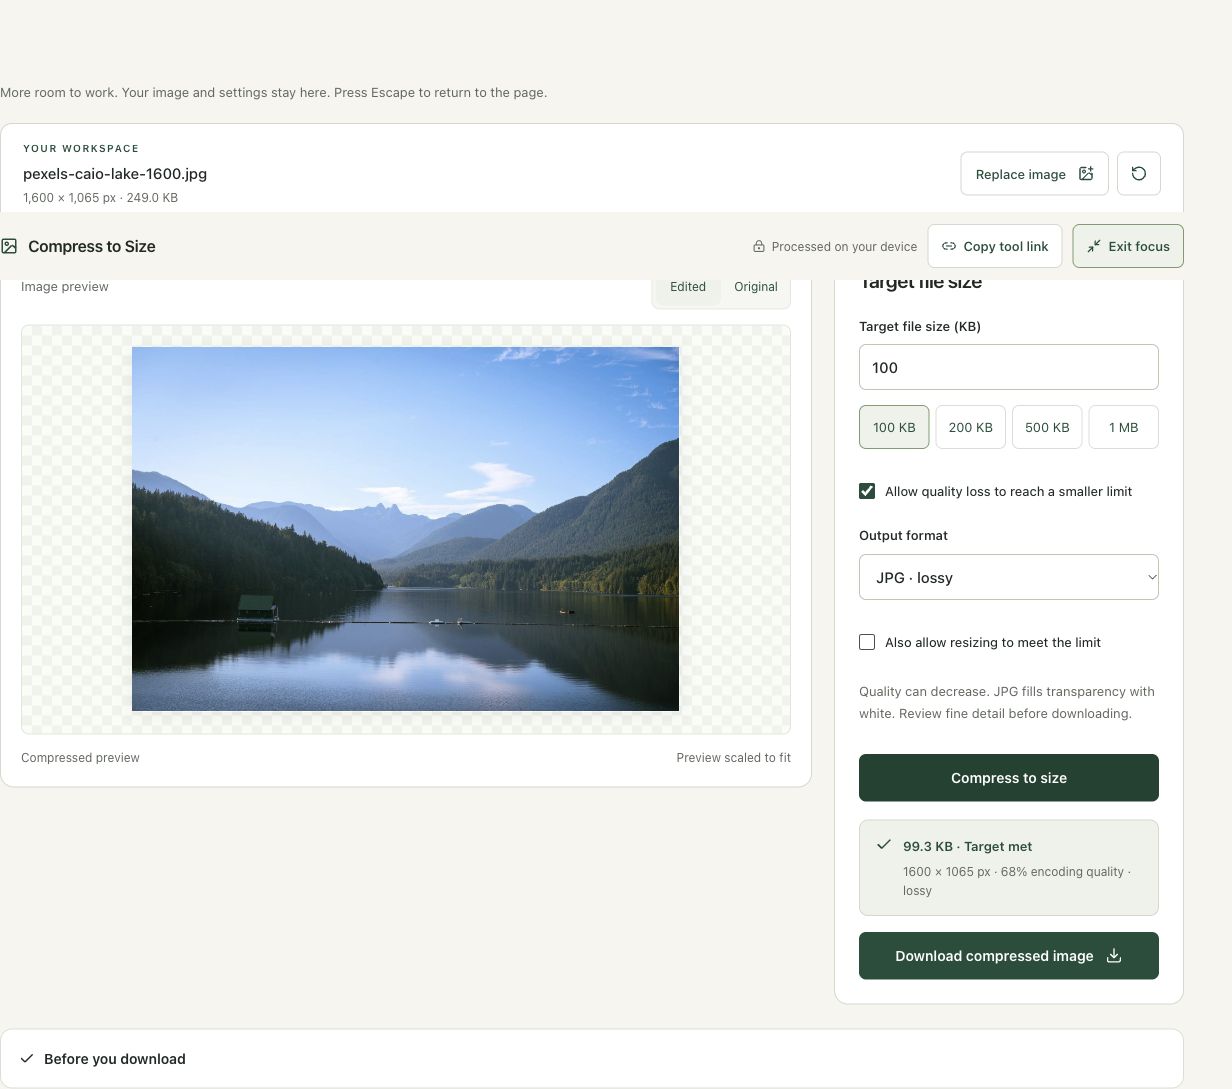
The 1,600 × 1,065 JPG started at 249.0 KB. With a 100 KB target, quality loss allowed and resizing disabled, the result was 99.3 KB at the same dimensions. The reported encoding quality was 68%.
The screenshots were captured from our working tools on October 6, 2026. Focus workspace is used to give the controls and preview more room. Captures show either the full workspace or the relevant panel; they are not recreated interface illustrations. Sizes and outcomes describe this sample, not a promised result for every image.
Follow the worked example, step by step
Read the settings and the result together. Keep an untouched source when a file is edited, and check the finished output before using it in another application. Each numbered step below includes a real screenshot of the corresponding workspace state. Use the full-size link when a control label is too small on your screen.
Step 1: Open Compress to Size and read the target controls
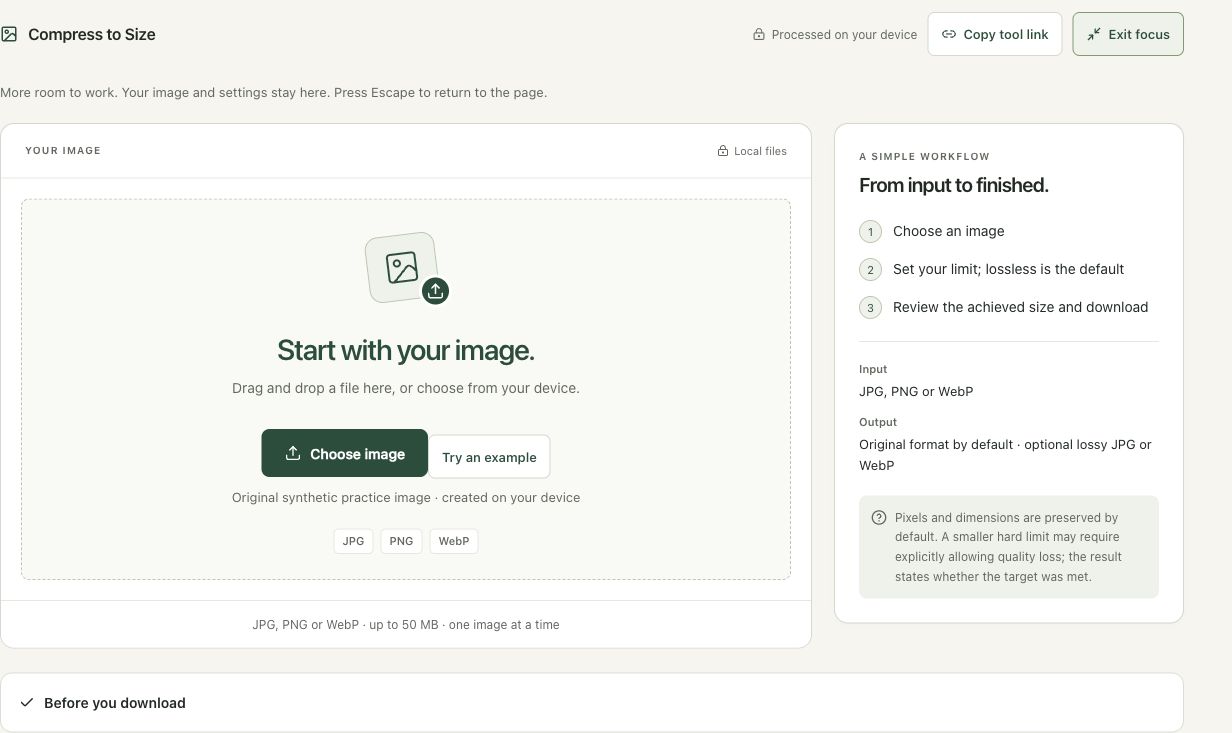
Open the workspace and identify the size requirement before selecting a photograph. The target is a file-size limit, not an image width. Keep the original in a separate folder so a smaller sharing copy does not replace it. Focus workspace expands the editor without changing how it processes the image. A first test with one file makes the result easier to inspect.
Step 2: Load the image and record its starting size
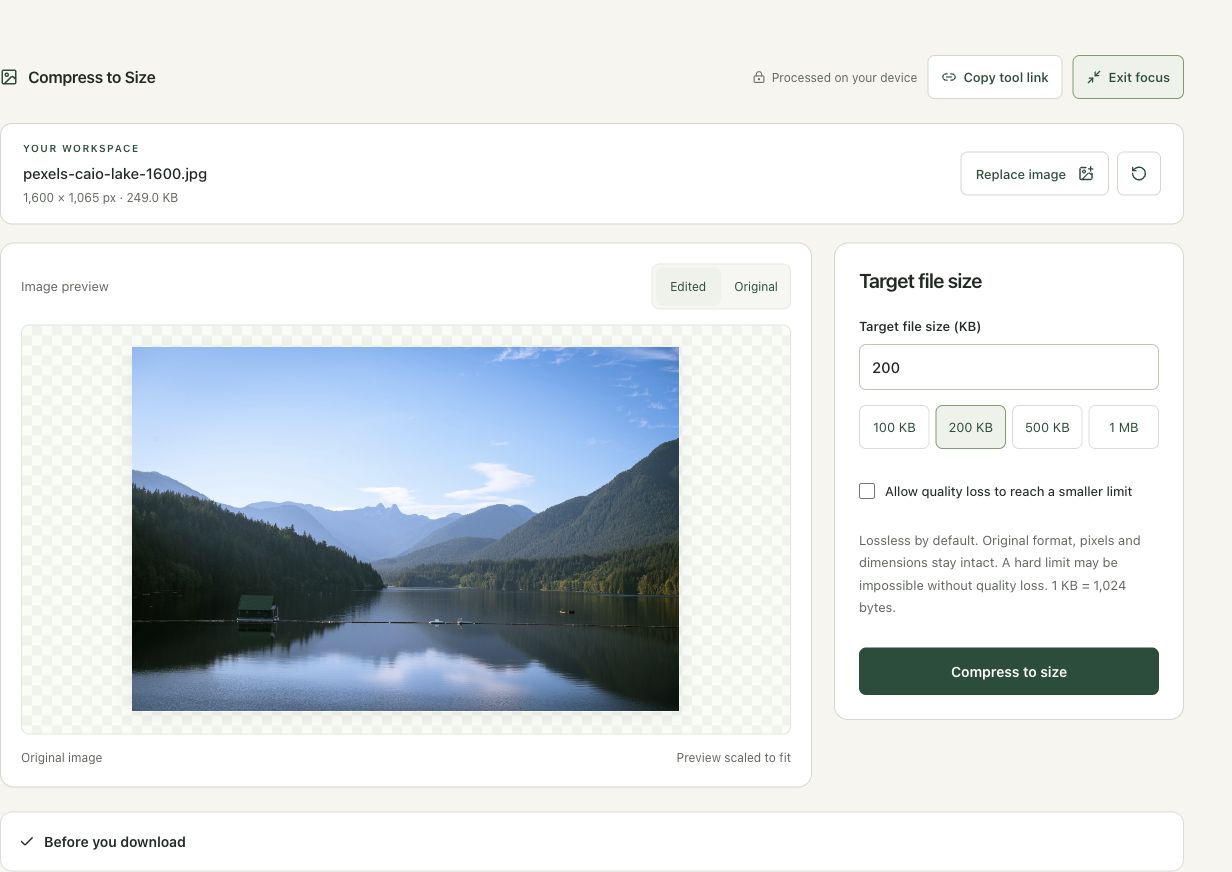
Choose the lake JPG. The asset bar reports 1,600 × 1,065 pixels and 249.0 KB. Those are two independent measurements: dimensions describe the pixel grid, while KB describes the encoded file. Read both before making changes. The original preview provides a reference for judging whether a later export loses fine texture or changes the overall composition.
Step 3: Set 100 KB and explicitly allow quality loss
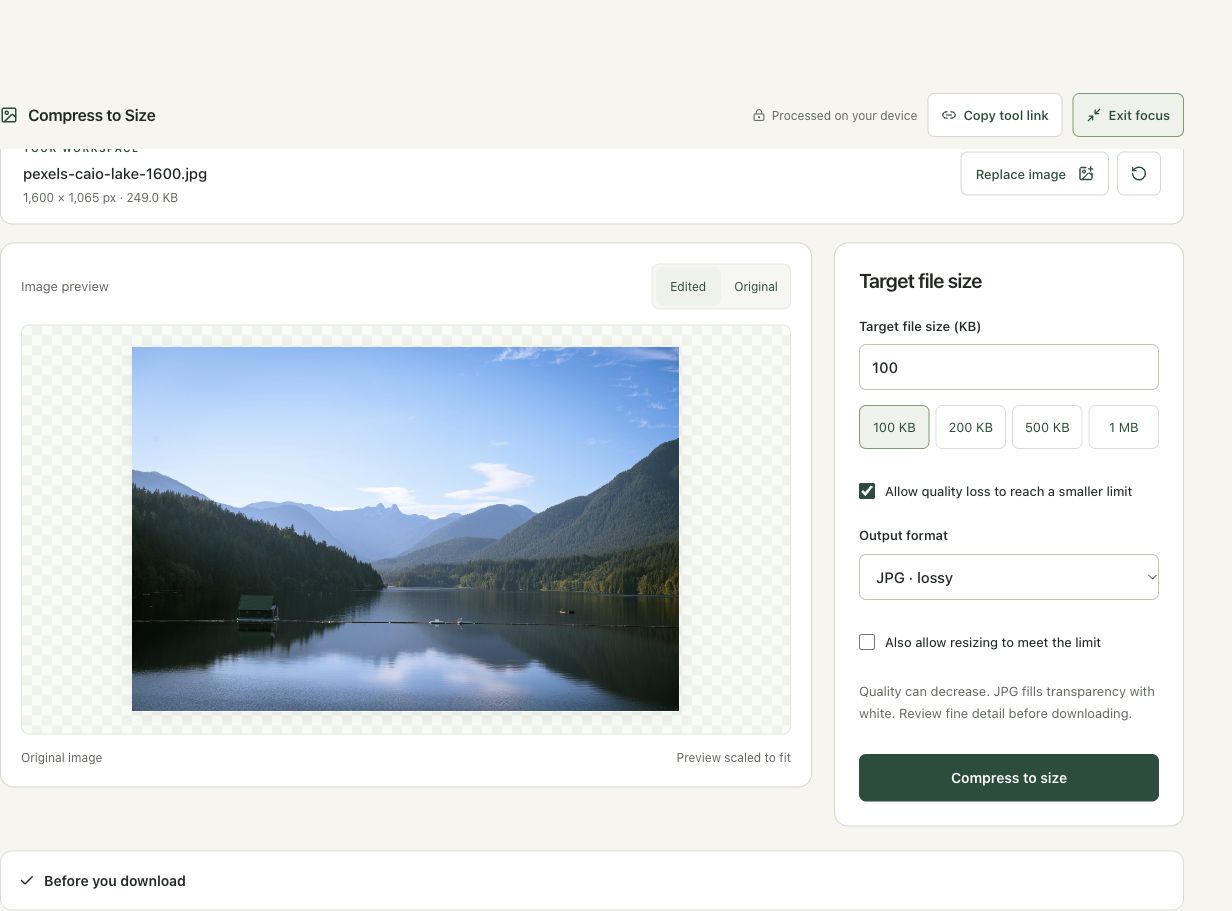
Enter 100 in Target file size (KB), enable Allow quality loss, and choose JPG. Leave Also allow resizing unchecked for this example. This lets the encoder search for a smaller representation while keeping the pixel dimensions. JPG cannot preserve transparent pixels. If you are working with a cutout, decide whether a white background is acceptable before choosing that format.
Step 4: Compress, compare the result and download
Choose Compress to size and wait for the finished result. This session reports 99.3 KB, Target met, and 1,600 × 1,065 pixels. Switch between Original and Edited to inspect details before downloading the compressed image. Read the dimensions again: if you allow resizing in another attempt, meeting the byte target may also reduce the number of pixels.
Check the result before using it
Inspect leaves, mountain edges and smooth sky at actual size. A target badge confirms the byte search succeeded; it does not establish that the remaining detail suits a particular application. Open the downloaded JPG and try it in the receiving form.
If the result is not what you expected
If lossless processing stays above the target, that is a valid outcome. Enable quality loss deliberately, or reduce dimensions if the destination permits it. The tool uses 1 KB = 1,024 bytes. For a form that means 100,000 bytes by “100 KB”, use a lower target such as 97 KB and verify the actual bytes.
Background and practical details
Read the receiving form first
Write down the accepted formats, maximum bytes and required dimensions before editing. A form that accepts only JPG will reject WebP even if the WebP is smaller. A passport-style form may also require an exact width and height. Compression alone does not satisfy that requirement. Keep an untouched original and make a separate submission copy.
Check how the destination defines KB. Smart Image Tools’s target field uses 1 KB = 1,024 bytes: 100 KB means 102,400 bytes. A destination using decimal units may mean 100,000 bytes instead. A target of 97 KB is 99,328 bytes and gives a small margin below a decimal 100 KB cap. The destination’s written requirement takes priority.
A smaller limit is not a command that can always be fulfilled without changing the image. Some sources are already efficiently compressed. The lossless workflow may keep the original when it cannot make a useful reduction. An above-target result is a reason to choose a tradeoff, not to assume that another click will make the image fit.
Choose quality loss deliberately
If the original is too large, enable Allow quality loss to reach a smaller limit. Choose the format that the form accepts. The tool searches encoding settings and reports its achieved size. JPG fills transparent pixels with white. WebP supports transparency, but the selected workflow uses lossy encoding. Neither option is a guarantee of an indistinguishable image.
Also allow resizing to meet the limit is a separate choice. Leave it unchecked when exact dimensions are required. If dimensions are flexible, reducing a large image can be more useful than repeatedly lowering quality at its original size. Watch the result dimensions: a smaller file that is too small in pixels can still fail the form’s rules.
Inspect the details that matter
For a document or screenshot, inspect the smallest text, thin lines and punctuation at actual size. For a photograph, inspect hair, shaded areas and smooth color transitions. Blockiness, halos or unreadable text mean the result needs another approach. A fitted preview can hide these problems because it shrinks the image on screen.
Work from the original for each new attempt. Repeatedly exporting an already lossy copy can introduce additional damage. Use Resize Image for a specific dimension requirement, then return to the byte limit. Changing pixel count changes how much information remains; it does not have a fixed relationship to the final compressed file size.
A submission checklist
- The downloaded extension and actual format are accepted.
- The result is below the limit using the destination’s units.
- Width and height match any required values.
- Important content remains readable and the intended background is correct.
- The receiving form accepts the downloaded file, not just its preview.
For the distinction between size and encoding, read our resizing versus compression guide. MDN documents how browser image encoding accepts format and quality settings; a quality setting is not a percentage of preserved detail.
Found a different result or an outdated instruction? Send the page URL and a description. Read our editorial policy for how we document methods and limitations.
Example sources and screenshot notes
The example uses a resized 1,600 × 1,065 copy of Lake surrounded by green mountains by Caio.
These photographs are used under the Pexels license. They are licensed images, not claimed as public domain. The photographer links identify the original sources; resizing and example processing were performed for this tutorial.
The controls shown are from the version tested for this guide. A later interface update or a different source can change a result. Compare the displayed format, dimensions and status with the instructions, and report a mismatch with the article URL and the setting involved. Our editorial policy explains how examples and corrections are reviewed.
Find the right tool for your image.
Explore the free workspaces, read their methods and inspect your result before sharing.
Explore image tools