A screenshot can expose information in several places at once. Review the whole frame, cover the intended regions with an opaque color and check the actual export rather than relying on a temporary selection outline.
- The tested example
- Step 1: Open Blur & Redact and choose a privacy goal
- Step 2: Inspect the original fictional screenshot
- Step 3: Set an opaque rectangle over the intended line
- Step 4: Download the flattened result and verify every edge
- Check the result
- Troubleshooting
- Background and practical details
- Example sources
TESTED WORKED EXAMPLE
What this session produced
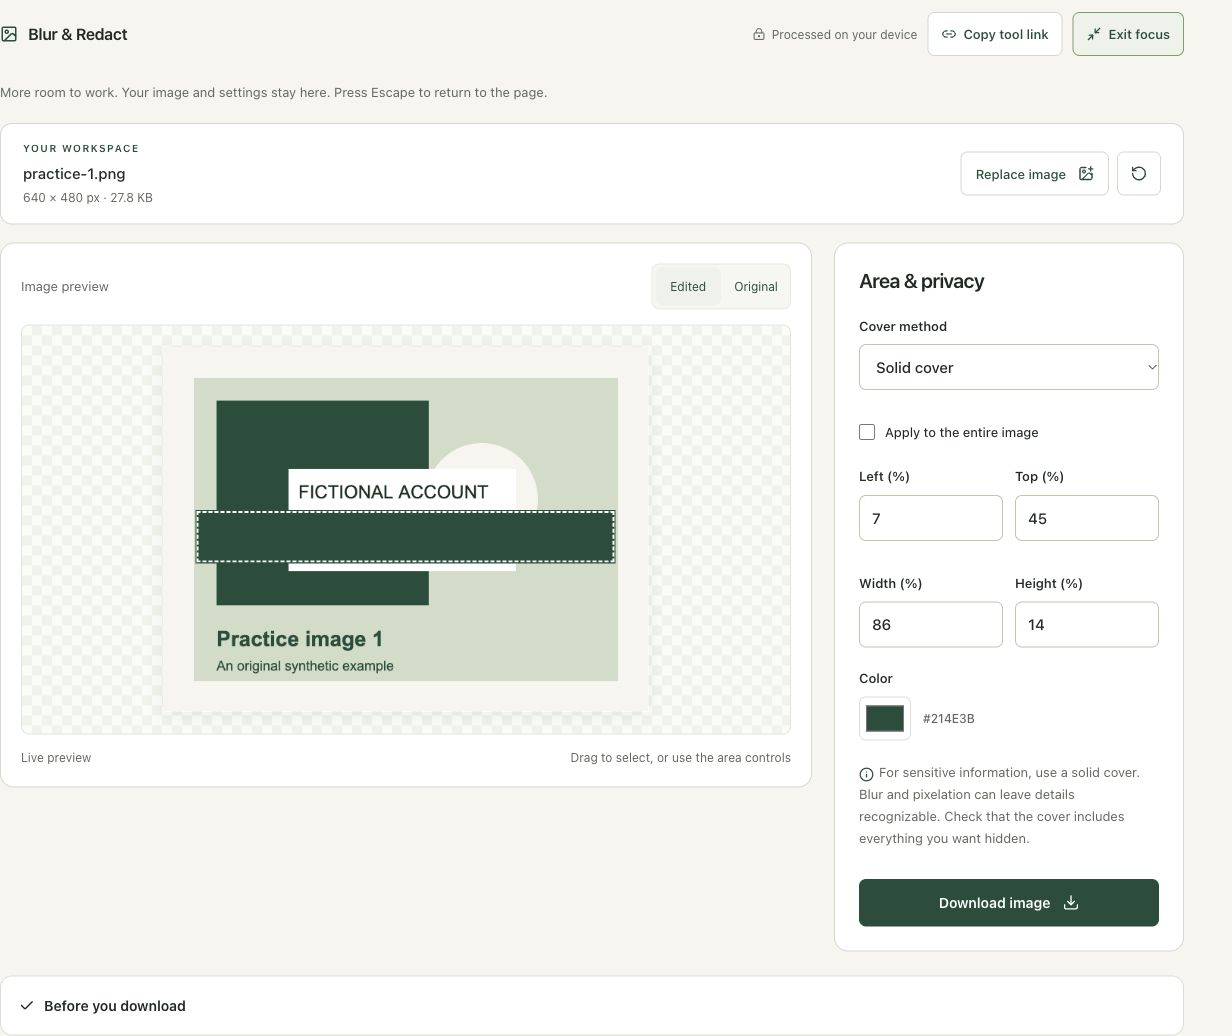
The fictional 640 × 480 account graphic was covered using Solid cover, left 7%, top 45%, width 86% and height 14%. The exported PNG contains the covered pixels; the original remains unchanged.
The screenshots were captured from our working tools on October 6, 2026. Focus workspace is used to give the controls and preview more room. Captures show either the full workspace or the relevant panel; they are not recreated interface illustrations. Sizes and outcomes describe this sample, not a promised result for every image.
Follow the worked example, step by step
Read the settings and the result together. Keep an untouched source when a file is edited, and check the finished output before using it in another application. Each numbered step below includes a real screenshot of the corresponding workspace state. Use the full-size link when a control label is too small on your screen.
Step 1: Open Blur & Redact and choose a privacy goal
Open Blur & Redact. Distinguish a decorative blur from concealing readable information. The default Solid cover is appropriate for the latter. Work on a sharing copy and keep any original containing private information in its intended private location. This tutorial uses a fictional practice image so no real person’s account details appear in the screenshots.
Step 2: Inspect the original fictional screenshot
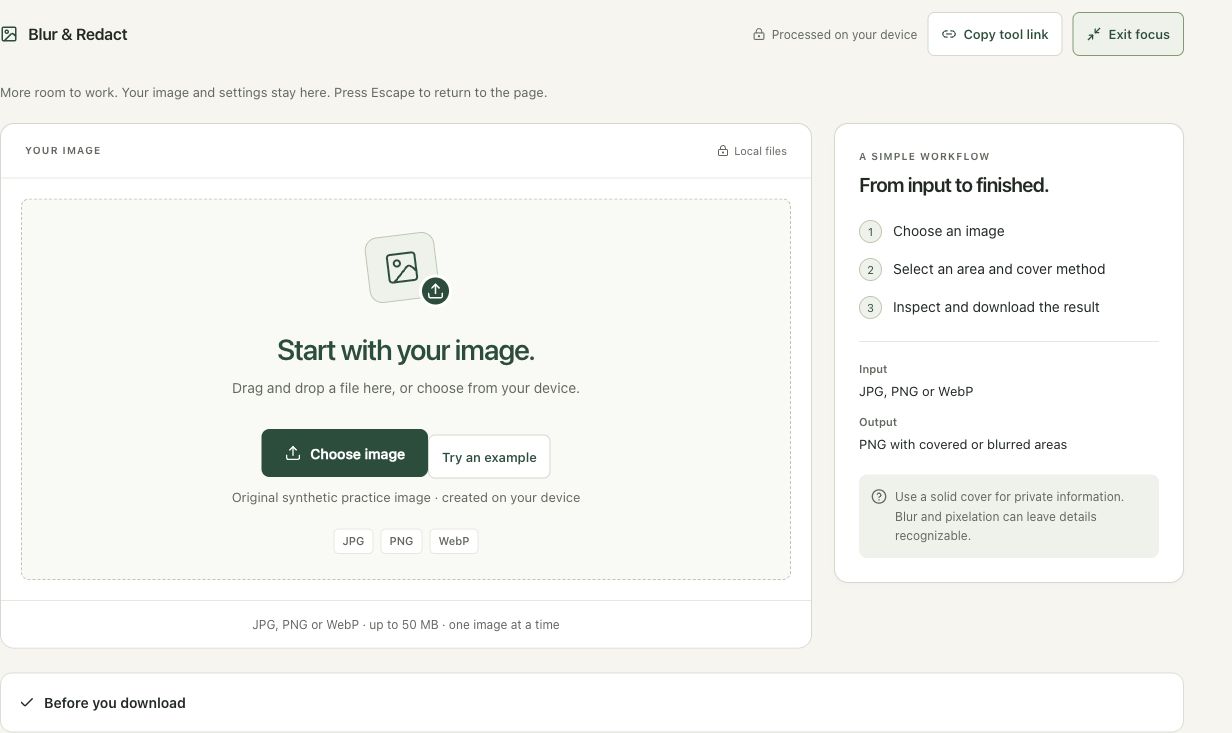
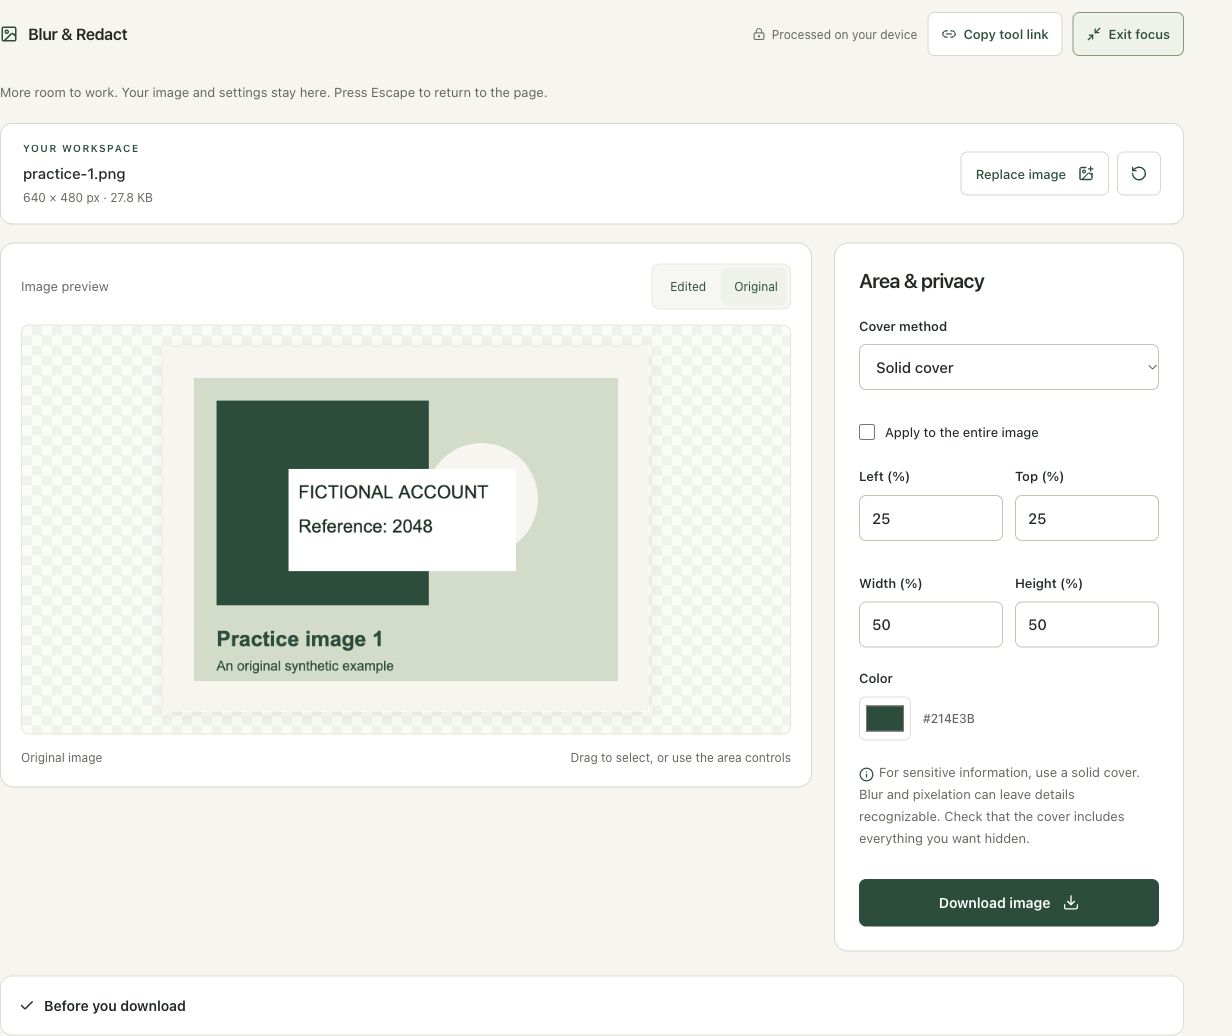
Use Try an example and select Original to see the uncensored practice graphic. Identify the complete text line that needs covering, including labels and trailing characters. Check surrounding regions for repeated references. A cover that hides the center of an identifier but leaves its beginning or ending visible may still disclose useful information.
Step 3: Set an opaque rectangle over the intended line
Keep Solid cover selected. Enter Left 7%, Top 45%, Width 86% and Height 14%, then use Edited to review the result. These controls describe relative source-image bounds, not the dimensions of the on-screen preview. Check that the opaque rectangle covers the whole intended line with space around it. Another screenshot will require different bounds.
Step 4: Download the flattened result and verify every edge
Choose Download image and wait for the ready status. Open the PNG and zoom into the covered line. Confirm that no characters remain visible around the rectangle, and inspect the rest of the image for related information. Do not share the original by mistake. Remove hidden metadata separately if that is also part of the publication requirement.
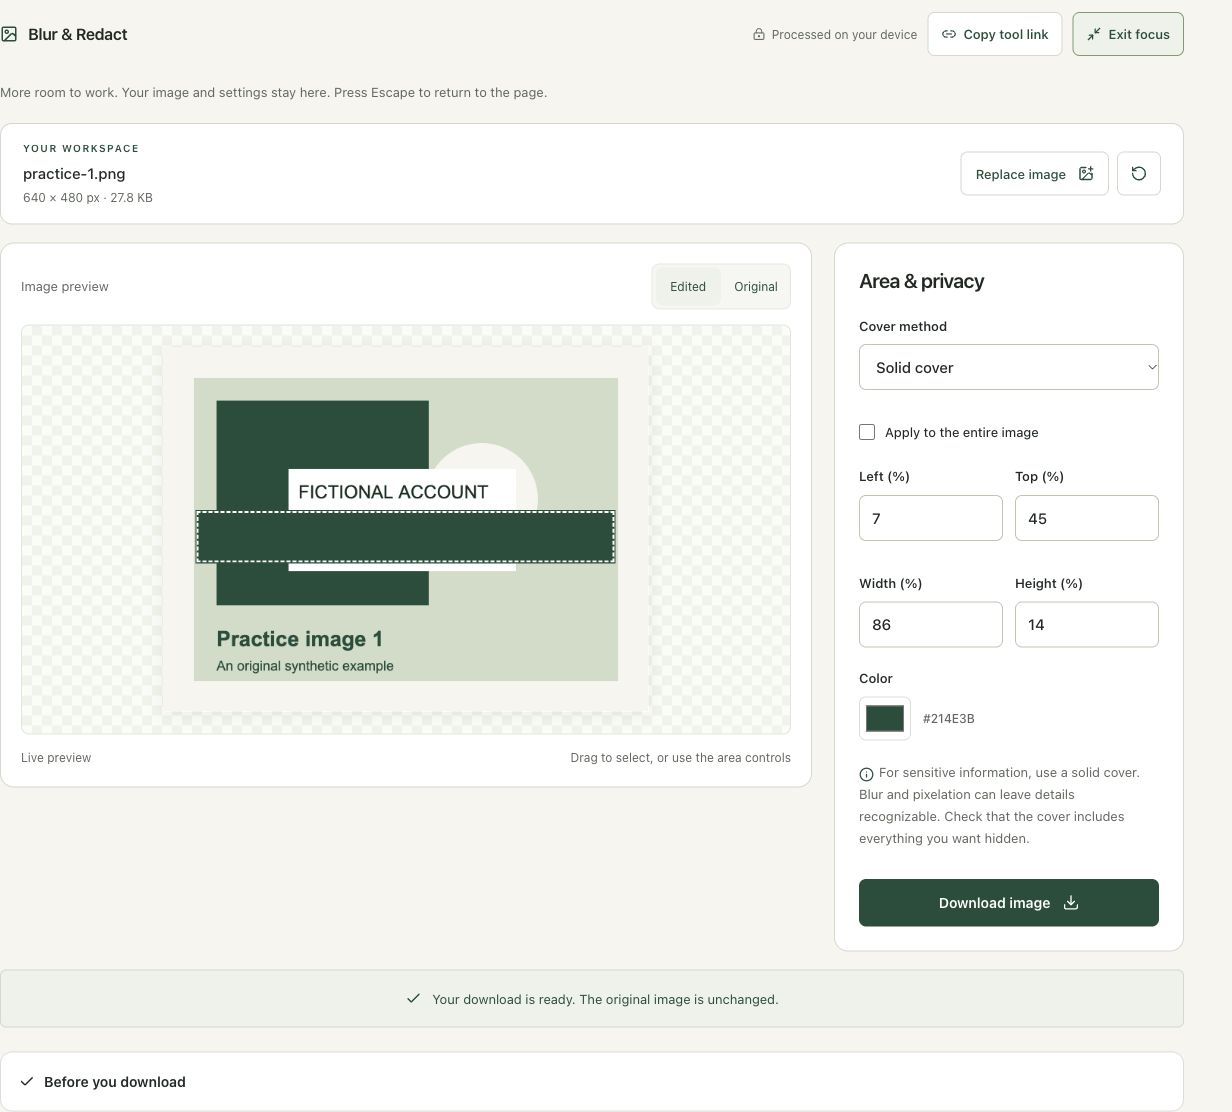
Check the result before using it
Inspect the exported image at full size for exposed characters, nearby duplicate identifiers and information outside the selected rectangle. Solid cover replaces the selected image pixels; it does not sanitize an entire document, remove hidden metadata or find other copies of the information.
If the result is not what you expected
Blur and pixelation can leave short identifiers recognizable. Use an opaque cover for private text. The area controls are percentages of the source dimensions. Add enough margin around the text, then verify the download rather than relying only on a selection outline.
Background and practical details
Review the entire screenshot
Look for names, email addresses, browser tabs, notification banners, addresses, order numbers and private text in the margins. The main document is not always the only source of disclosure. A small label outside the area you initially noticed can still be legible when somebody opens the full-resolution file.
Make a working copy and keep the original private. Decide whether the whole screenshot is necessary. Cropping away unrelated surroundings can reduce what needs to be reviewed, but it does not remove information that remains inside the retained frame. Inspect the crop itself before treating it as a sharing copy.
Choose a solid cover for private information
Open Blur & Redact. For sensitive text or details, use Solid cover. Blur and pixelation leave transformed visual information and can keep patterns recognizable. A decorative blur that looks unreadable in a small preview is not a reliable substitute for deliberately overwriting the selected pixels.
Choose an opaque color that makes the edited area easy to identify. The workspace exports a flattened PNG, so the cover is part of the resulting raster pixels. This is an image-editing workflow, not a general-purpose redaction system for PDF text layers, document attachments or other hidden structures.
Understand percentage bounds
On a 1,000 × 800 screenshot, Left 10% begins at x = 100 pixels and Width 30% corresponds to 300 pixels before any boundary clamping. Top and height are relative to the image height. Numeric percentages let you revisit a region, but the actual visible content determines how much margin is needed.
A selection is limited by the image edges. After moving a region, inspect the new width and height and check that the entire detail is still inside it. The outline is only an editing aid and is not included in the exported PNG. Judge the solid covered area rather than assuming that the border itself hides something.
Handle several regions deliberately
The workspace uses one selected region at a time. For several separate details, export a checked covered copy, reopen that copy and cover the next region, then review the completed sequence. Retain the source privately and give intermediate files clear names so they are not confused with the final sharing version.
Apply to the entire image is a separate option. It can be useful for a full-frame effect but would erase useful content when Solid cover is selected. Confirm the active option before exporting. A completed opaque cover cannot later reveal the source pixels from that PNG, so keep your private original if you need an unredacted reference.
Check the delivery file and sharing context
Open the actual downloaded file, inspect the edges and confirm that no alternate screenshot or original is being attached. Pixel edits do not review filenames, surrounding message text or the destination service. Use Remove EXIF separately when metadata is also part of your sharing review.
MDN documents blur as a canvas filter; blurring changes appearance rather than promising confidential content removal. Read our metadata guide to distinguish visible content from embedded file information.
Keep an untouched source and inspect the downloaded result. If an instruction differs from the workspace, send the page URL and the setting involved. Our editorial policy explains how we review examples and limitations.
Example sources and screenshot notes
This example uses an original synthetic graphic with fictional information. No real private account information is shown.
The controls shown are from the version tested for this guide. A later interface update or a different source can change a result. Compare the displayed format, dimensions and status with the instructions, and report a mismatch with the article URL and the setting involved. Our editorial policy explains how examples and corrections are reviewed.
Find the right tool for your image.
Explore the free workspaces, read their methods and inspect your result before sharing.
Explore image tools