Print size depends on the number of source pixels and the density at which they are placed on paper. A file-size value in MB cannot tell you whether a photo is detailed enough for a particular print.
- The tested example
- Step 1: Open the print calculator and choose the calculation direction
- Step 2: Enter the photo dimensions at 300 PPI
- Step 3: Compare 200 PPI in centimeters
- Step 4: Download the calculation and verify the print setup
- Check the result
- Troubleshooting
- Background and practical details
- Example sources
TESTED WORKED EXAMPLE
What this session produced
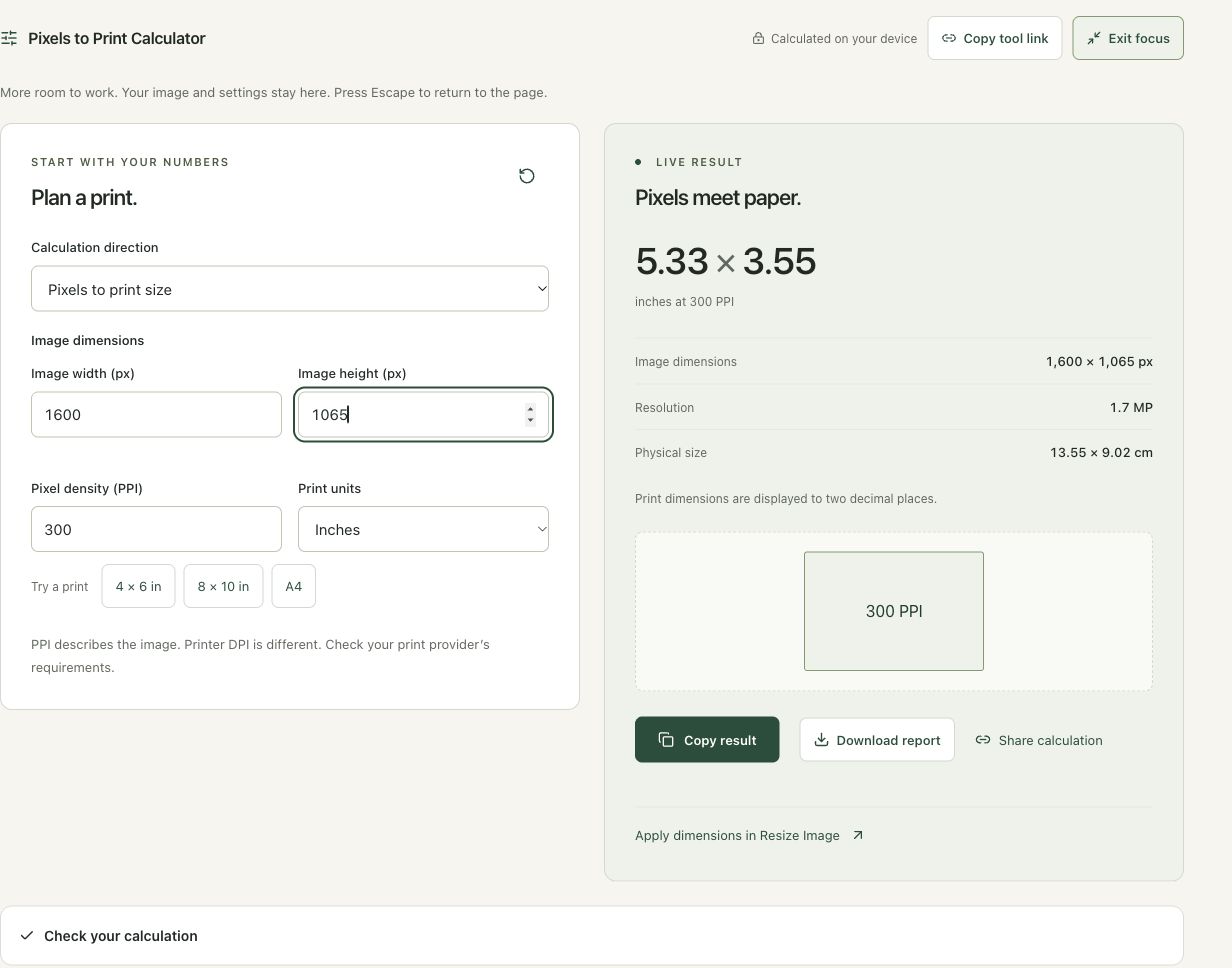
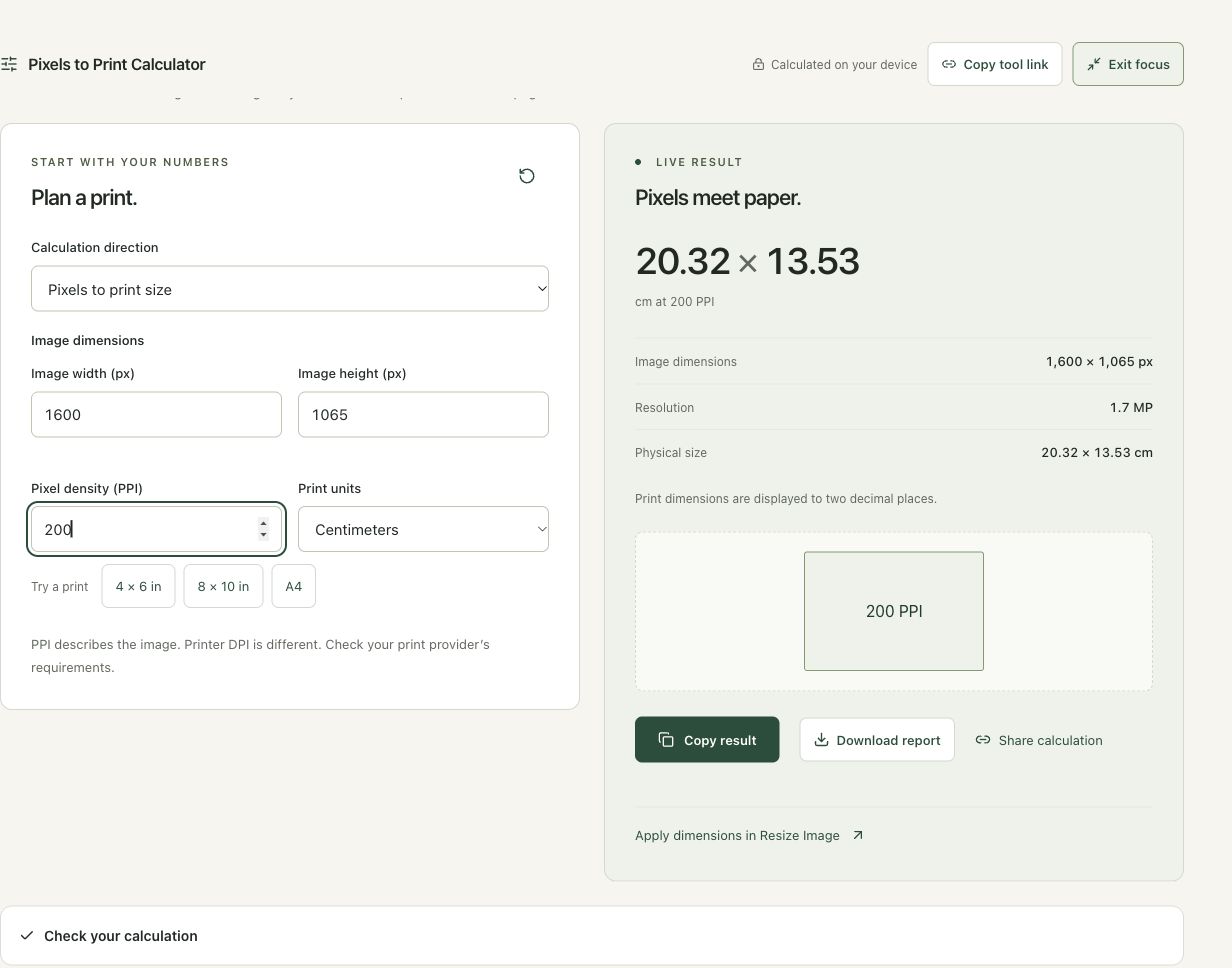
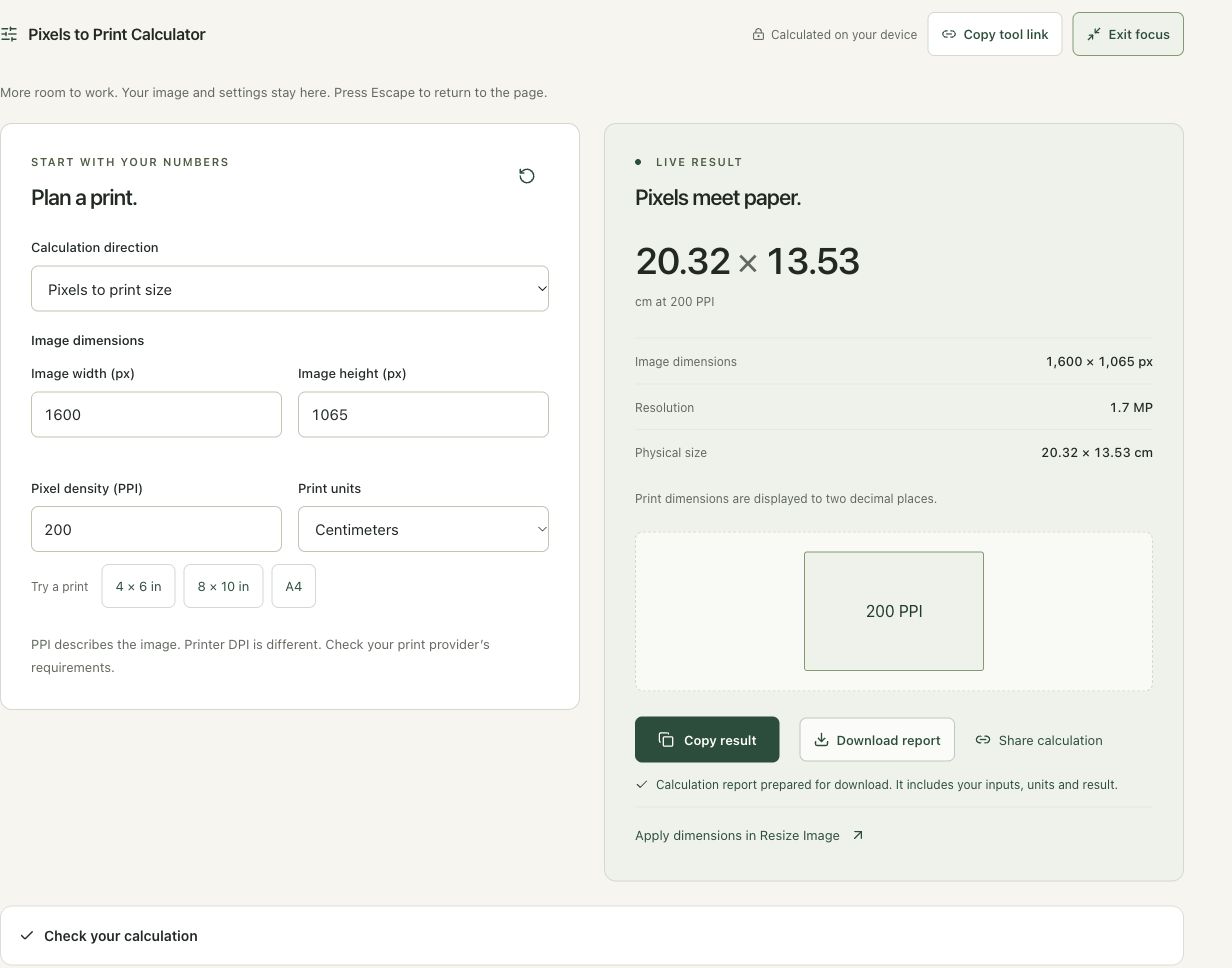
A 1,600 × 1,065 image measures about 5.33 × 3.55 inches at 300 PPI. At 200 PPI it measures 20.32 × 13.53 centimeters. The pixel count remains unchanged in both calculations.
The screenshots were captured from our working tools on October 6, 2026. Focus workspace is used to give the controls and preview more room. Captures show either the full workspace or the relevant panel; they are not recreated interface illustrations. Sizes and outcomes describe this sample, not a promised result for every image.
Follow the worked example, step by step
Read the settings and the result together. Keep an untouched source when a file is edited, and check the finished output before using it in another application. Each numbered step below includes a real screenshot of the corresponding workspace state. Use the full-size link when a control label is too small on your screen.
Step 1: Open the print calculator and choose the calculation direction
Open Pixels to Print Calculator. Use Pixels to print size when you know the existing image dimensions, or Print size to pixels when planning a required image. This walkthrough starts with a real photo’s pixel grid. The calculator does not change its metadata or resample it; it makes the relationship between pixels, density and physical size explicit.
Step 2: Enter the photo dimensions at 300 PPI
Set Image width to 1,600 and Image height to 1,065, leaving density at 300 PPI and units at inches. The result is approximately 5.33 × 3.55 inches. Divide each pixel dimension by PPI to understand the calculation. The displayed result rounds physical sizes to two decimals, so preserve the underlying source numbers for a precise print specification.
Step 3: Compare 200 PPI in centimeters
Change density to 200 and select Centimeters. The same image now plans a 20.32 × 13.53 cm print. No additional pixels were created. A lower density permits a larger physical placement, but whether it is acceptable depends on the print process, subject and viewing distance. Ask the provider for its requirement rather than treating one density as universally best.
Step 4: Download the calculation and verify the print setup
Choose Download report. Keep the density, units and source dimensions with the planned print size. Compare that plan with the provider’s requested trim and bleed, and inspect the composition before ordering. Applying dimensions in Resize Image is a separate operation; unnecessary enlargement cannot restore detail merely because the calculator expresses a larger physical size.
Check the result before using it
Confirm the print provider’s requested dimensions, density, bleed and cropping. PPI is image pixel density, while printer DPI describes a different process. A calculation does not certify that every subject or viewing distance will look sufficiently detailed.
If the result is not what you expected
Changing PPI in this calculator changes the planned physical size, not the source resolution. Choosing a larger print can expose limited detail. If a frame has a different ratio, decide whether to crop or use borders instead of stretching the image.
Background and practical details
Use the pixel dimensions
Find the actual width and height of the image, not the size of its thumbnail on screen. You can use Image Info to read decoded dimensions. If you will crop the photo, use the dimensions after that crop. Pixels removed from an edge are no longer available to cover the printed area.
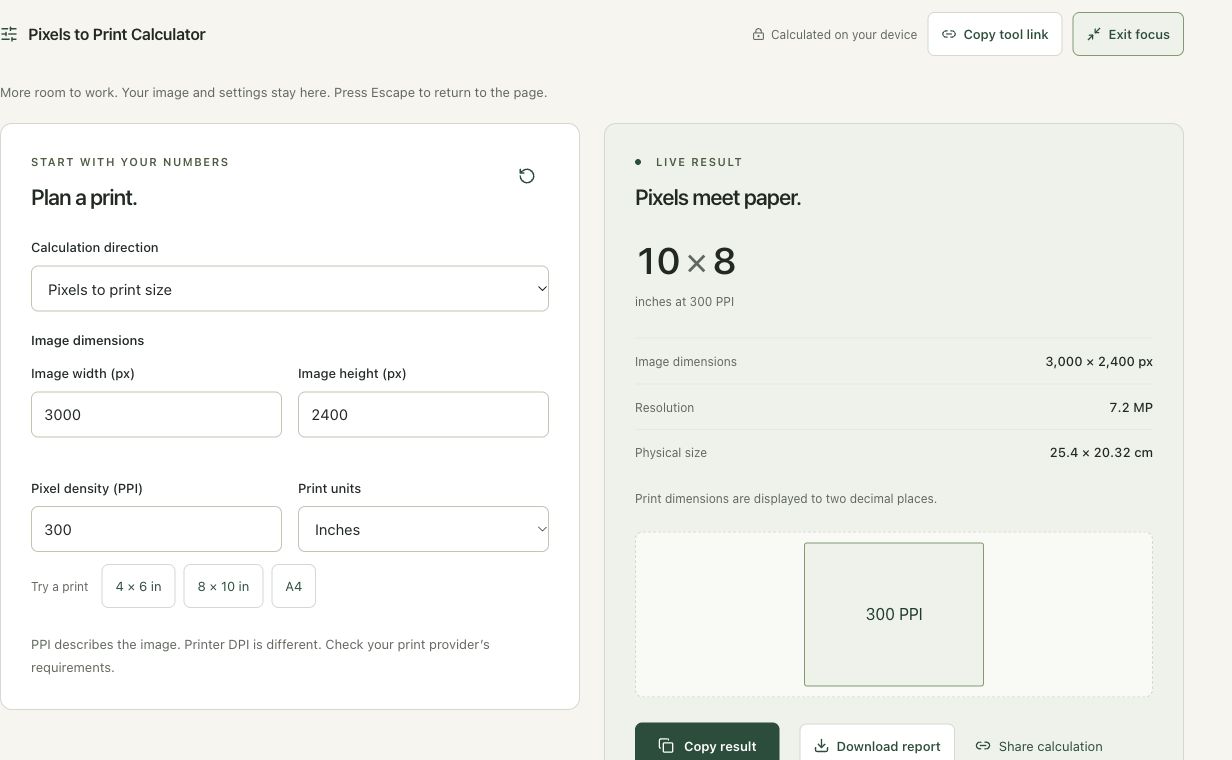
The relationship is simple: print width in inches = pixel width / PPI. Apply the same formula to the height. To convert inches to centimeters, multiply by 2.54. PPI describes source pixels per inch of print. Printer DPI describes a printer’s dot placement; these numbers do not represent the same thing.
A worked 10 × 8 inch example
A 3,000 × 2,400 image placed at 300 PPI gives 10 × 8 inches, or 25.4 × 20.32 cm. At 150 PPI, the same pixels cover 20 × 16 inches. The second print has a larger area with fewer source pixels per inch; the source has not gained detail.
Calculate pixels from a desired print
For the reverse problem, pixel width = width in inches × PPI. An 8 × 10 inch print at 300 PPI needs 2,400 × 3,000 pixels before considering cropping or bleed. Smart Image Tools’s print-to-pixels mode rounds fractional requirements up to whole pixels so the calculation does not undershoot the requested density.
The printer’s requirements still matter. A finished paper size may differ from the artwork area if there is a border or bleed. Check those instructions before cropping. A photo’s aspect ratio can also differ from the paper’s; filling the page can remove content, while fitting the entire photo can leave margins.
Is 300 PPI always required?
Adobe’s print-resolution guidance treats 300 PPI as a common high-quality print standard and discusses viewing distance. It is a useful planning value, not a guarantee of quality or a requirement for every poster. Ask your print provider which density it expects at the final size.
A sharply focused source can be useful at a lower density for a larger print viewed from farther away. A blurry source can still look blurry at 300 PPI. The calculator cannot detect missed focus, motion blur, heavy compression or poor lighting. Inspect the original and, when practical, make a small proof print of an important area.
Changing a tag does not create detail
A resolution tag may tell an application an intended physical scale. Changing that tag from 96 to 300 without adding pixels does not increase captured detail. Browser exports can write their own density metadata, as explained in MDN’s canvas export reference. Use actual pixels and the intended placement size to judge density.
Resampling in Resize Image adds or removes pixels. Enlarging can satisfy a numerical dimension requirement without recovering fine texture. Keep your high-resolution original and check the print provider’s preferred file format and color workflow before export. For web upload limits, use the byte-size guide; that is a different requirement.
Found a different result or an outdated instruction? Send the page URL and a description. Read our editorial policy for how we document methods and limitations.
Example sources and screenshot notes
This calculator session uses explicit example dimensions and units. It plans a result without uploading, modifying or inspecting an image file.
The controls shown are from the version tested for this guide. A later interface update or a different source can change a result. Compare the displayed format, dimensions and status with the instructions, and report a mismatch with the article URL and the setting involved. Our editorial policy explains how examples and corrections are reviewed.
Find the right tool for your image.
Explore the free workspaces, read their methods and inspect your result before sharing.
Explore image tools