An aspect ratio describes shape, while pixel dimensions describe size. Keeping that distinction clear helps you resize a picture without stretching it or expecting resizing to perform a crop.
- The tested example
- Step 1: Open the calculator and identify the known side
- Step 2: Enter 1,600 × 1,065 as the source dimensions
- Step 3: Request a new width of 800 and read the rounding
- Step 4: Save the report or apply the dimensions in Resize Image
- Check the result
- Troubleshooting
- Background and practical details
- Example sources
TESTED WORKED EXAMPLE
What this session produced
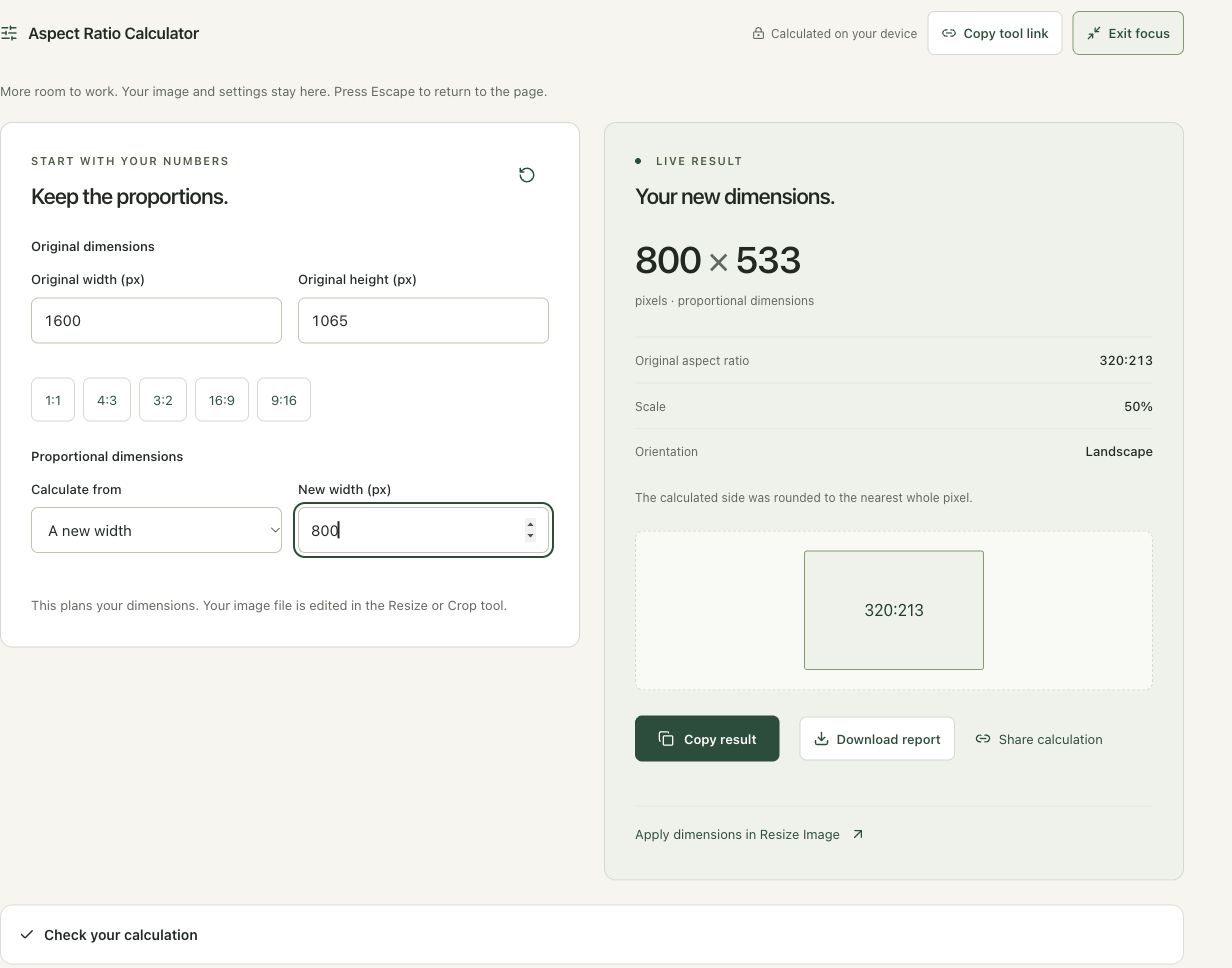
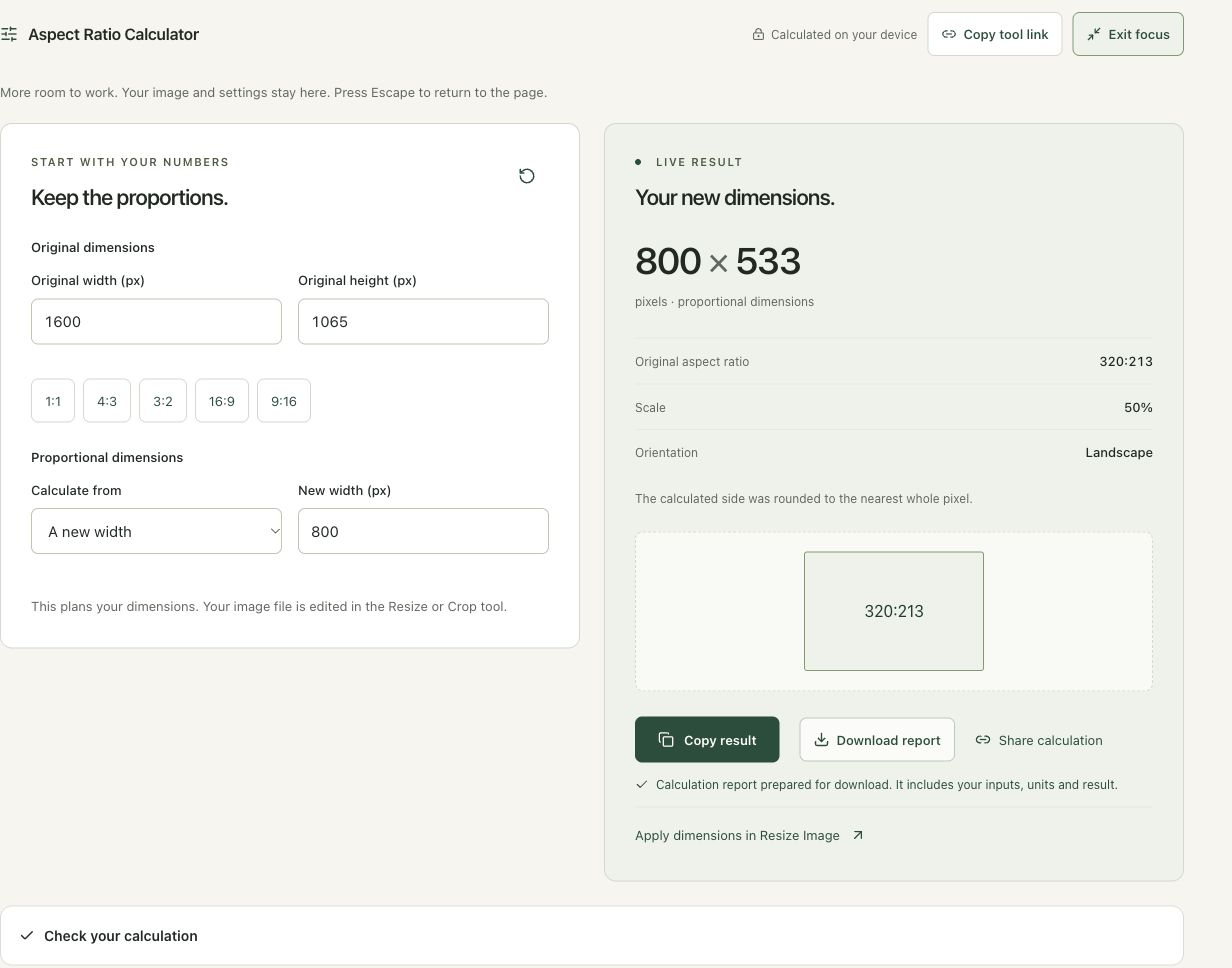
For a 1,600 × 1,065 image, a requested width of 800 gives a calculated height of 532.5, rounded to 533. The original reduced ratio is 320:213 and the width scale is 50%.
The screenshots were captured from our working tools on October 6, 2026. Focus workspace is used to give the controls and preview more room. Captures show either the full workspace or the relevant panel; they are not recreated interface illustrations. Sizes and outcomes describe this sample, not a promised result for every image.
Follow the worked example, step by step
Read the settings and the result together. Keep an untouched source when a file is edited, and check the finished output before using it in another application. Each numbered step below includes a real screenshot of the corresponding workspace state. Use the full-size link when a control label is too small on your screen.
Step 1: Open the calculator and identify the known side
Open Aspect Ratio Calculator. Decide whether the new width or new height is the value supplied by the destination. Enter source dimensions rather than guessing from the visible preview. This tool calculates a proportional plan and a shape preview; it does not open or modify an image file. Use Resize Image afterward to apply the chosen dimensions.
Step 2: Enter 1,600 × 1,065 as the source dimensions
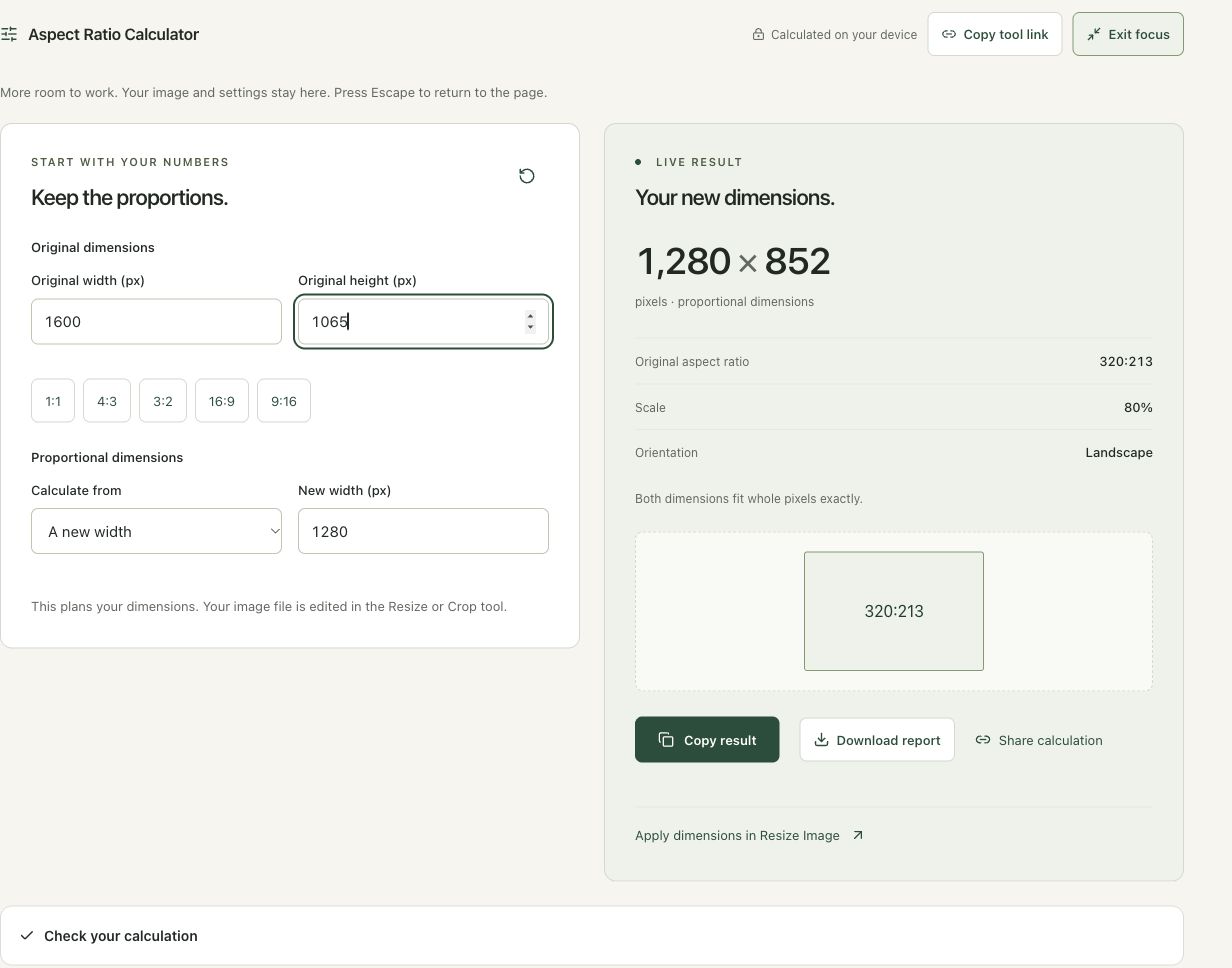
Set Original width to 1,600 and Original height to 1,065. The reduced ratio is 320:213, so it is close to a common landscape shape without being exactly 3:2. Do not replace the actual numbers with a familiar ratio when exact dimensions matter. The live result updates as you change the inputs.
Step 3: Request a new width of 800 and read the rounding
Keep A new width selected and enter 800. The live result is 800 × 533 at a 50% width scale. The underlying proportional height is 532.5, so the calculator rounds to a whole pixel and says so. This small change is expected for raster dimensions. Check strict upload rules if a destination requires an exact mathematical ratio.
Step 4: Save the report or apply the dimensions in Resize Image
Choose Download report to retain the inputs and result. The Apply dimensions in Resize Image link transfers the planned values to the resizing workspace, where you still need to choose an image and inspect the export. Keep the calculator report as a plan, not proof that a file has been edited. Check the actual downloaded dimensions afterward.
Check the result before using it
Read the rounding notice and verify the actual image export. The calculator plans dimensions but does not edit a file. A strict destination can validate the rounded pixels or require an exact ratio, so use its actual requirements.
If the result is not what you expected
Forcing both sides independently can distort a subject. Crop or add canvas space when the shape must change. A nearest-whole-pixel result can differ slightly from the original exact ratio; choose a divisible size if an exact ratio is essential.
Background and practical details
Read width and height in the correct order
Open Aspect Ratio Calculator and enter the original width and height in pixels. Width comes first. A 1920 × 1080 picture is landscape, while 1080 × 1920 is portrait. The numbers contain the same pixel count but describe different shapes and cannot be substituted without changing the composition.
Use Image Information when you do not know the source dimensions. Read the decoded image size rather than estimating from a thumbnail. A display on a web page can be smaller than the underlying file, so measuring its apparent size does not necessarily reveal its pixel dimensions.
Simplify the ratio
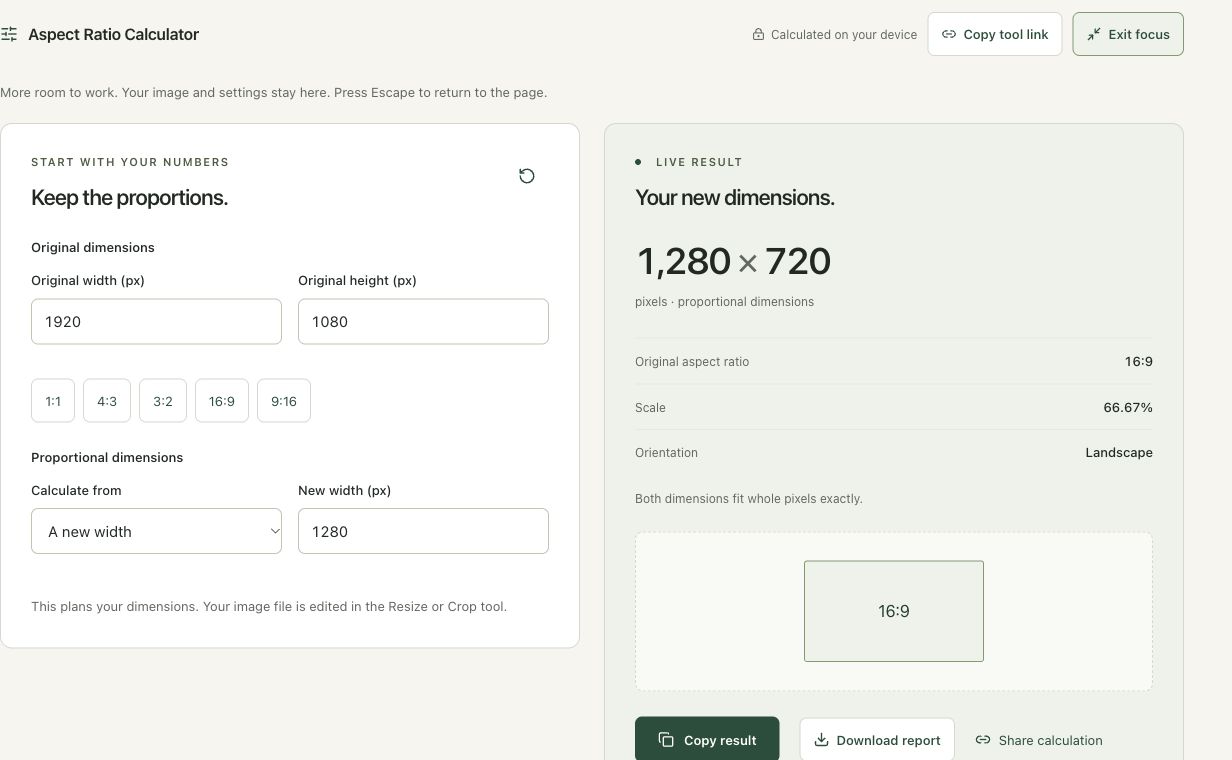
Divide width and height by their greatest common divisor. For 1920 and 1080 that divisor is 120, giving 16:9. The simplified ratio describes the same shape using smaller whole numbers. A 1280 × 720 image also reduces to 16:9 even though it contains fewer pixels.
A ratio does not state image sharpness, file size or print quality. A very small 16:9 image and a very large one can have the same proportions. MDN’s aspect-ratio reference describes the width-to-height relationship used for rectangular layout. The calculator makes that relationship explicit for image planning.
Calculate the missing side
Choose whether to set a new width or a new height. With a new width, proportional height = new width × original height ÷ original width. With a new height, proportional width = new height × original width ÷ original height. Both formulas apply the same scale to each side.
For the example, setting width to 1280 gives 1280 × 1080 ÷ 1920 = 720. The planned output is 1280 × 720. Setting only the width in an editor with aspect-ratio locking should lead to that proportional height. Forcing 1280 × 1080 instead would make the picture narrower relative to its height.
Understand whole-pixel rounding
Some requested dimensions produce a fractional missing side. For a 3:2 image at width 1000, the ideal height is 666.666… pixels. The calculator rounds to the nearest whole pixel and reports rounding when it is needed. The result is never below one pixel.
This tiny rounding difference is unavoidable for that exact width on a whole-pixel grid. If a destination demands an exact ratio as well as whole dimensions, choose dimensions that divide cleanly by the ratio units. For 3:2, a width of 999 pairs with height 666. Check the destination’s actual validation rules before choosing between a prescribed width and a mathematically exact ratio.
Use a crop or canvas for another shape
Proportional resizing keeps the existing shape. It cannot turn landscape into square while retaining both the whole picture and edge-to-edge coverage. Use Crop Image to discard outer content, or Social Image Formatter to fit the picture into a different canvas with padding.
The calculator does not edit a file. Copy the result and open Resize Image to apply the dimensions. Shared calculator links contain the numeric settings and calculation mode, rather than an image or filename. Anyone with the link can read those settings, which is useful when agreeing on a target size before producing an export.
Verify the resulting image
Inspect the exported width and height, then check faces, logos and circles for unwanted stretching. Keep the original for later crops or larger outputs. If the destination also has a byte limit, treat that as a separate requirement and consult the upload-limit guide after settling the dimensions.
Keep an untouched source and inspect the downloaded result. If an instruction differs from the workspace, send the page URL and the setting involved. Our editorial policy explains how we review examples and limitations.
Example sources and screenshot notes
This calculator session uses explicit example dimensions and units. It plans a result without uploading, modifying or inspecting an image file.
The controls shown are from the version tested for this guide. A later interface update or a different source can change a result. Compare the displayed format, dimensions and status with the instructions, and report a mismatch with the article URL and the setting involved. Our editorial policy explains how examples and corrections are reviewed.
Find the right tool for your image.
Explore the free workspaces, read their methods and inspect your result before sharing.
Explore image tools