
A flat background can often be removed by matching its color. The challenge is protecting similar colors inside the subject and handling edges that blend with the background.
- The tested example
- Step 1: Open color removal for a simple, known backdrop
- Step 2: Load the original painted-checkerboard graphic
- Step 3: Sample both tones and keep edge-connected removal
- Step 4: Apply removal and inspect the transparent result
- Check the result
- Troubleshooting
- Background and practical details
- Example sources
TESTED WORKED EXAMPLE
What this session produced
The practice graphic’s white and gray checkerboard tones were sampled with Connected to image edges selected. The result contained 259,200 transparent pixels (84.38%) and retained 48,000 opaque pixels, including the enclosed white detail.
The screenshots were captured from our working tools on October 6, 2026. Focus workspace is used to give the controls and preview more room. Captures show either the full workspace or the relevant panel; they are not recreated interface illustrations. Sizes and outcomes describe this sample, not a promised result for every image.
Follow the worked example, step by step
Read the settings and the result together. Keep an untouched source when a file is edited, and check the finished output before using it in another application. Each numbered step below includes a real screenshot of the corresponding workspace state. Use the full-size link when a control label is too small on your screen.
Step 1: Open color removal for a simple, known backdrop
Open Remove Color Background. Choose this method for a solid backdrop or painted checkerboard with predictable colors. A busy natural scene needs a different approach, such as AI background removal. Keep the source because the tool cannot reconstruct colors lost when artwork was flattened onto a background.

Step 2: Load the original painted-checkerboard graphic
Choose Try an example. The 640 × 480 synthetic image includes two backdrop tones, a colored shape and an enclosed light detail. Inspect it before selecting colors. The checkerboard is part of the opaque source pixels, so simply saving as PNG would not create transparency. The example is designed to make the removal-area distinction visible.
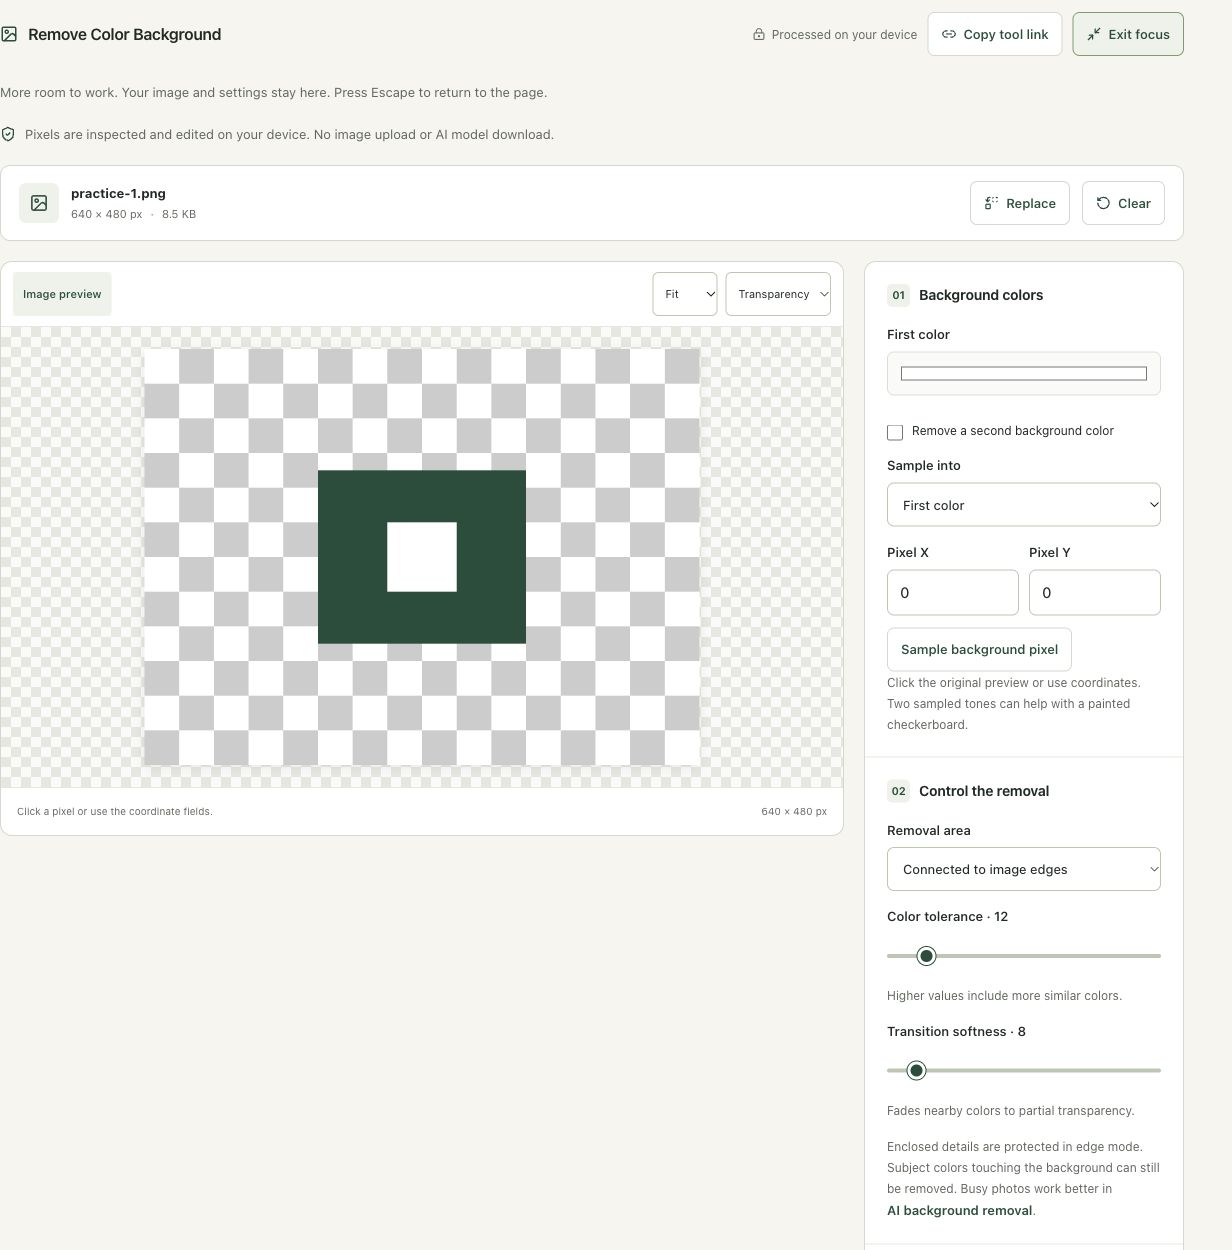
Step 3: Sample both tones and keep edge-connected removal
Sample the background at Pixel X 0, Pixel Y 0 into First color. Enable a second background color, choose Second color in Sample into, and sample Pixel X 60, Pixel Y 0. Keep Connected to image edges selected, with the displayed tolerance and softness. These coordinates apply to this specific example; use your own backdrop pixels for another image.
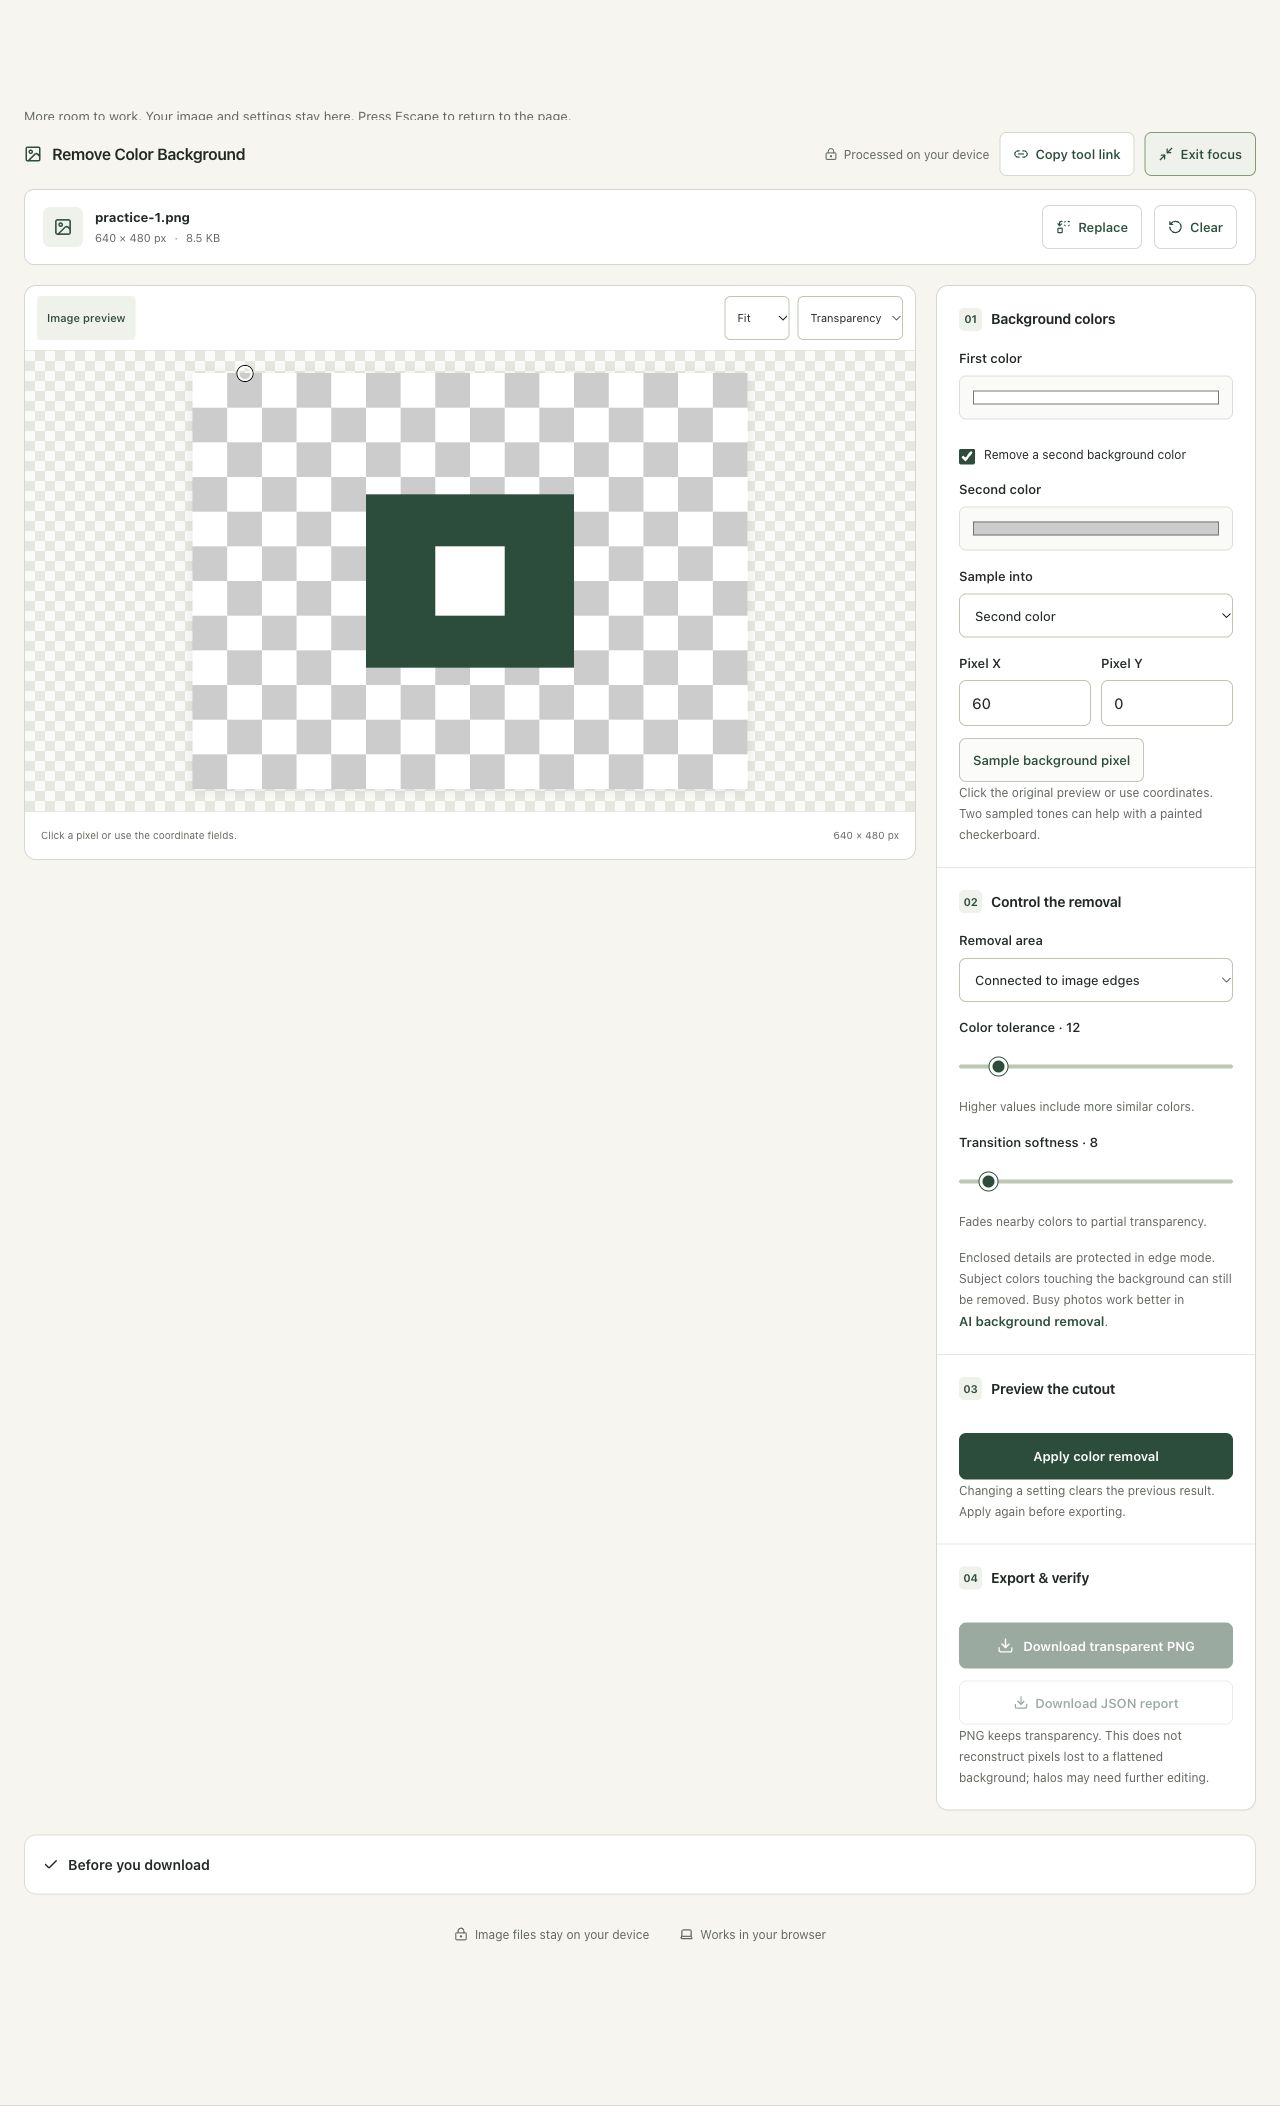
Step 4: Apply removal and inspect the transparent result
Choose Apply color removal and wait for the cutout. Compare the source with the result on light and dark surfaces. Check that enclosed matching details remain and that no backdrop tone is left near the edges. Download the transparent PNG or JSON report. Changing settings clears the previous result, so apply them again before exporting a revised attempt.
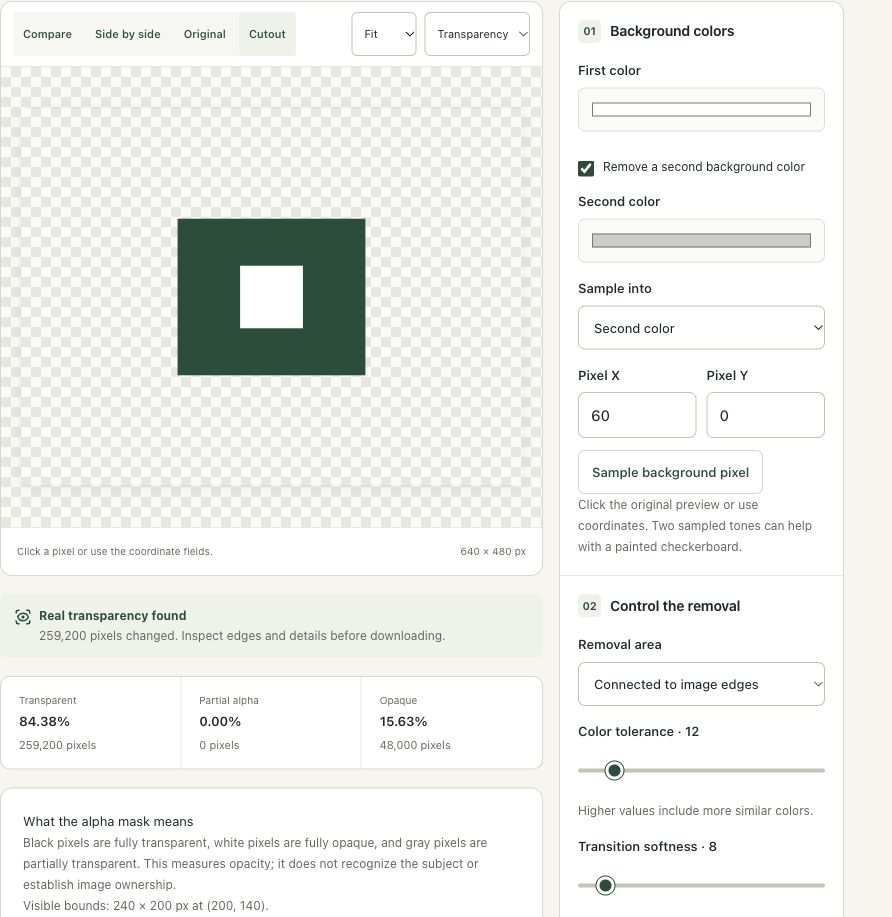
Check the result before using it
Inspect the cutout on contrasting surfaces and check the enclosed white detail. This is color matching and connectivity, not AI subject recognition. Softened boundaries can retain halos from a previously flattened background.
If the result is not what you expected
One sampled color may leave the second checkerboard tone. Two samples can help, but increasing tolerance too far can remove subject pixels. Edge mode protects enclosed regions only while no matching path connects them to an image edge.
Background and practical details
Choose color removal for a suitable image
Open Remove Color Background for a logo, icon or graphic with a fairly uniform backdrop. This tool uses color matching and pixel connectivity. It does not use an AI model to identify a foreground subject, so a complex photograph usually needs a different approach.
If a person’s hair, clothing or shadow blends with several background colors, try AI Background Remover and inspect its mask. For a simple graphic, color removal gives direct control over which colors become transparent. Keep an untouched source so every comparison can start from the same pixels.
Select the background colors carefully
The primary color starts from the source’s upper-left pixel. That is a useful initial guess only if that pixel belongs to the background. Check it against the actual backdrop and select the appropriate color when the corner instead contains the subject, a border or an unrelated mark.
You can enable a second color when two tones must be removed, such as a checkerboard painted into the picture. A checkerboard appearance alone does not mean a file is transparent. Use Transparency Checker to inspect actual alpha and distinguish painted squares from the editor’s transparency preview.
Start with edge-connected removal
Under Removal area, choose Connected to image edges to limit matching removal to regions connected to the image boundary. An enclosed patch of the same color can remain intact when it is separated from that boundary by other pixels. This is particularly useful for white details inside a dark logo.
This protection depends on the pixel arrangement. A white shirt touching a white background, or a small gap that connects an interior region to the outside, can still be affected. Choose All matching pixels only when matching regions throughout the picture should become transparent, including any enclosed patches.
Higher tolerance includes more similar colors. It can remove leftover backdrop shades but also consume foreground details. Softness fades nearby colors to partial transparency. It does not reliably repair every color fringe or make a busy backdrop behave like a uniform one. Change one control at a time so you can identify its effect.
Inspect alpha on different backgrounds
Examine the result over light and dark surfaces. Thin pale fringes can disappear against white and become obvious against black. Likewise, holes inside a logo may be hard to notice on a checkerboard. The PNG specification describes alpha support; transparency is part of the saved pixel representation, rather than a filename convention.
The removal changes alpha values. It is not a secure redaction method for concealing information, and fully transparent pixels can still carry hidden color values. For a sensitive screenshot, use an opaque cover and follow the screenshot redaction guide instead.
Keep a practical output check
Download the transparent PNG and test it in the intended document or page. Check that the actual file has alpha, all necessary details remain visible and the edge quality is acceptable. If removal cannot separate the backdrop from matching subject colors, use a better source or another method rather than repeatedly widening tolerance.
Keep an untouched source and inspect the downloaded result. If an instruction differs from the workspace, send the page URL and the setting involved. Our editorial policy explains how we review examples and limitations.
Example sources and screenshot notes
This example uses original synthetic practice graphics created by Smart Image Tools. They are controlled fixtures, not photographic performance benchmarks.
The controls shown are from the version tested for this guide. A later interface update or a different source can change a result. Compare the displayed format, dimensions and status with the instructions, and report a mismatch with the article URL and the setting involved. Our editorial policy explains how examples and corrections are reviewed.
Find the right tool for your image.
Explore the free workspaces, read their methods and inspect your result before sharing.
Explore image tools