A good image animation depends on sequence and timing as much as image quality. Arrange the frames first, choose how they fit the canvas and review a complete playback cycle before sharing.
- The tested example
- Step 1: Open GIF Maker and plan the sequence
- Step 2: Load three original synthetic frames
- Step 3: Set the first delay to one second and the maximum side to 320
- Step 4: Create the GIF and watch the finished loop
- Check the result
- Troubleshooting
- Background and practical details
- Example sources
TESTED WORKED EXAMPLE
What this session produced
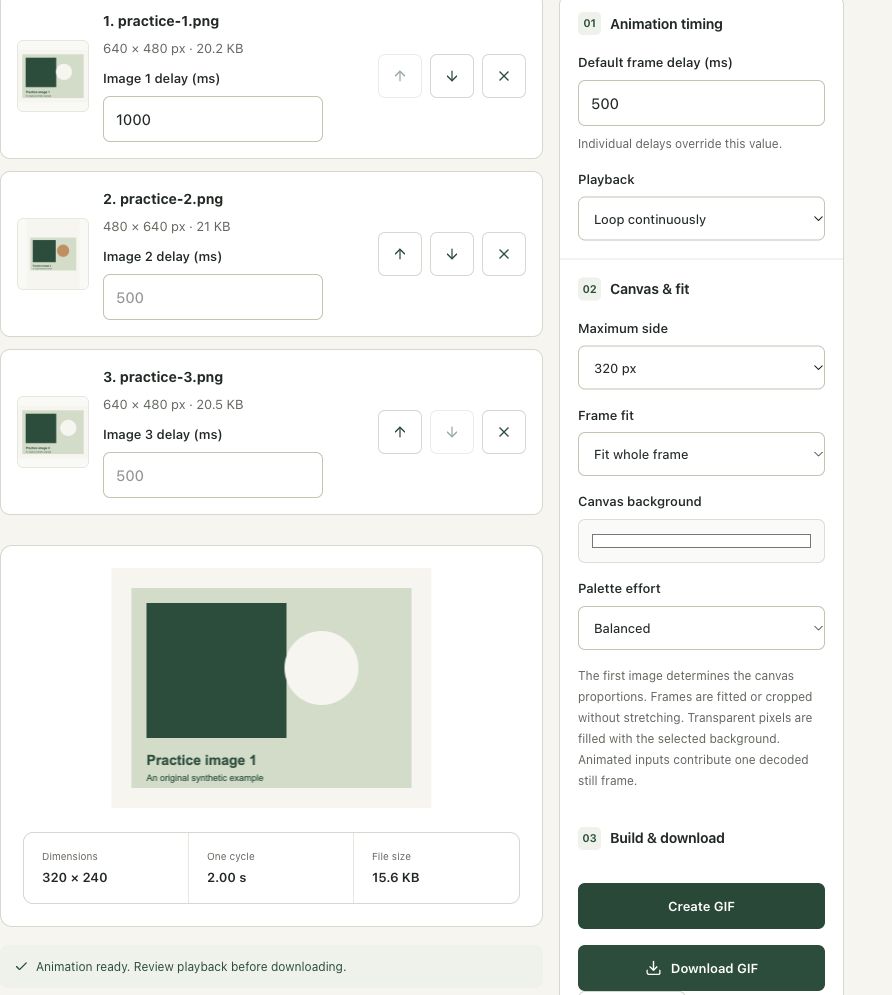
Three synthetic frames produced a 320 × 240 GIF. The first frame used 1,000 ms and the other two used 500 ms each, giving a two-second cycle. The result was 15.6 KB with continuous looping.
The screenshots were captured from our working tools on October 6, 2026. Focus workspace is used to give the controls and preview more room. Captures show either the full workspace or the relevant panel; they are not recreated interface illustrations. Sizes and outcomes describe this sample, not a promised result for every image.
Follow the worked example, step by step
Read the settings and the result together. Keep an untouched source when a file is edited, and check the finished output before using it in another application. Each numbered step below includes a real screenshot of the corresponding workspace state. Use the full-size link when a control label is too small on your screen.
Step 1: Open GIF Maker and plan the sequence
Open GIF Maker. Choose the intended order and the time each frame should remain visible. An animation is a sequence of still images, so a useful loop needs deliberate pacing rather than only a file-size target. Start with a short practice sequence before adding a large collection, and keep the originals for later timing or framing changes.
Step 2: Load three original synthetic frames
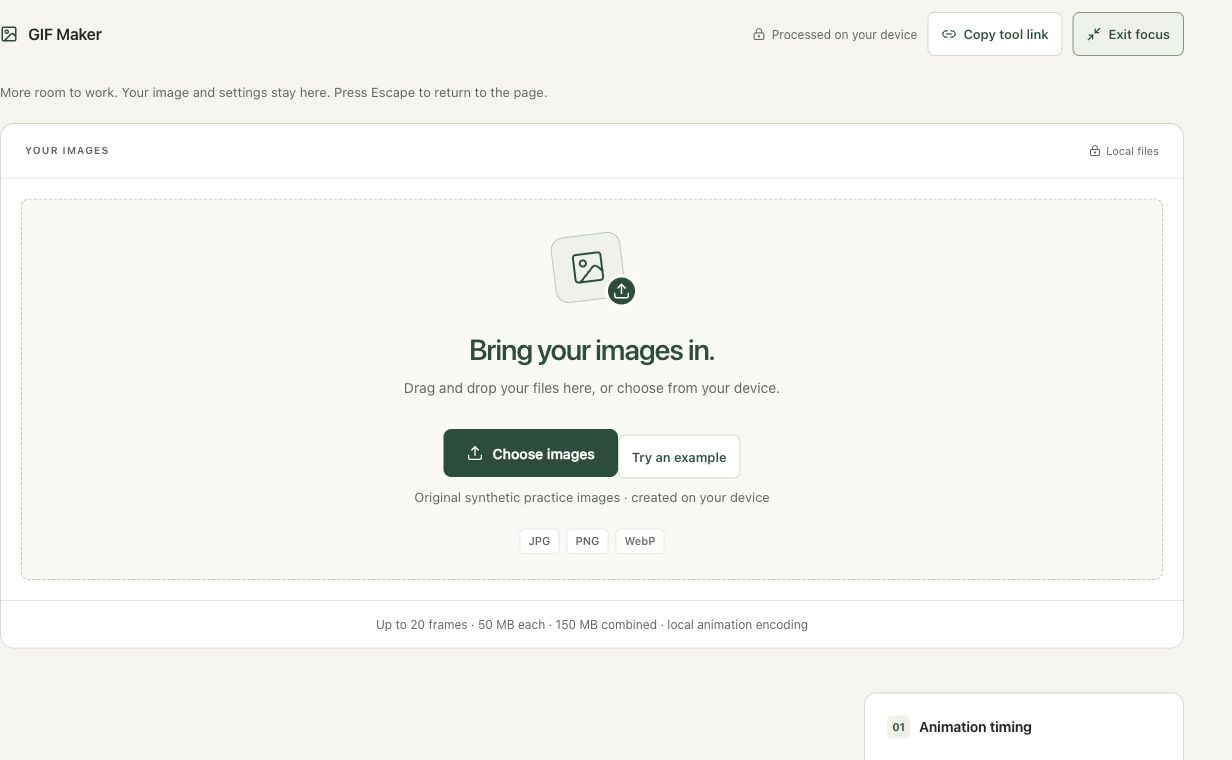
Use Try an example to add three practice graphics. The cards show their order and individual dimensions, including a portrait middle frame. Review this before choosing a canvas fit. The first image determines the output proportions, so mixed orientations create different framing decisions. Keep the whole portrait frame with padding or intentionally crop it to fill the common canvas.
Step 3: Set the first delay to one second and the maximum side to 320
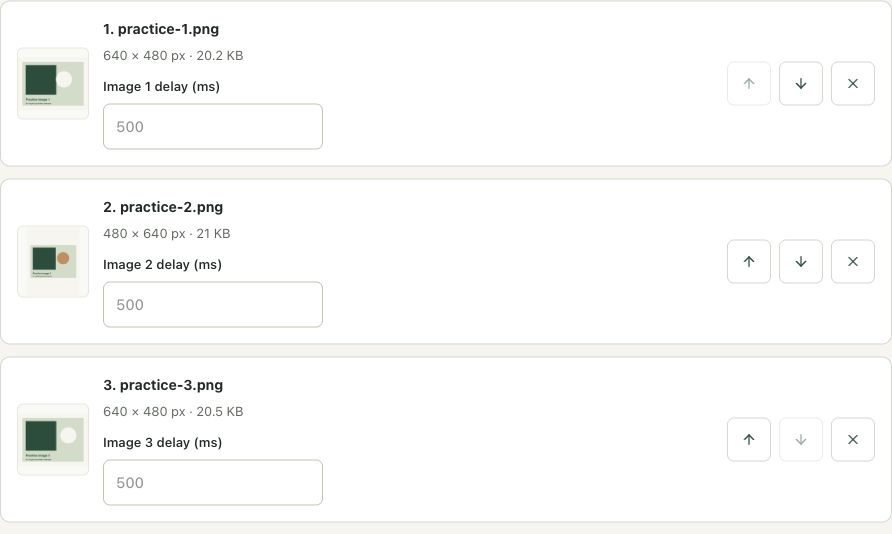
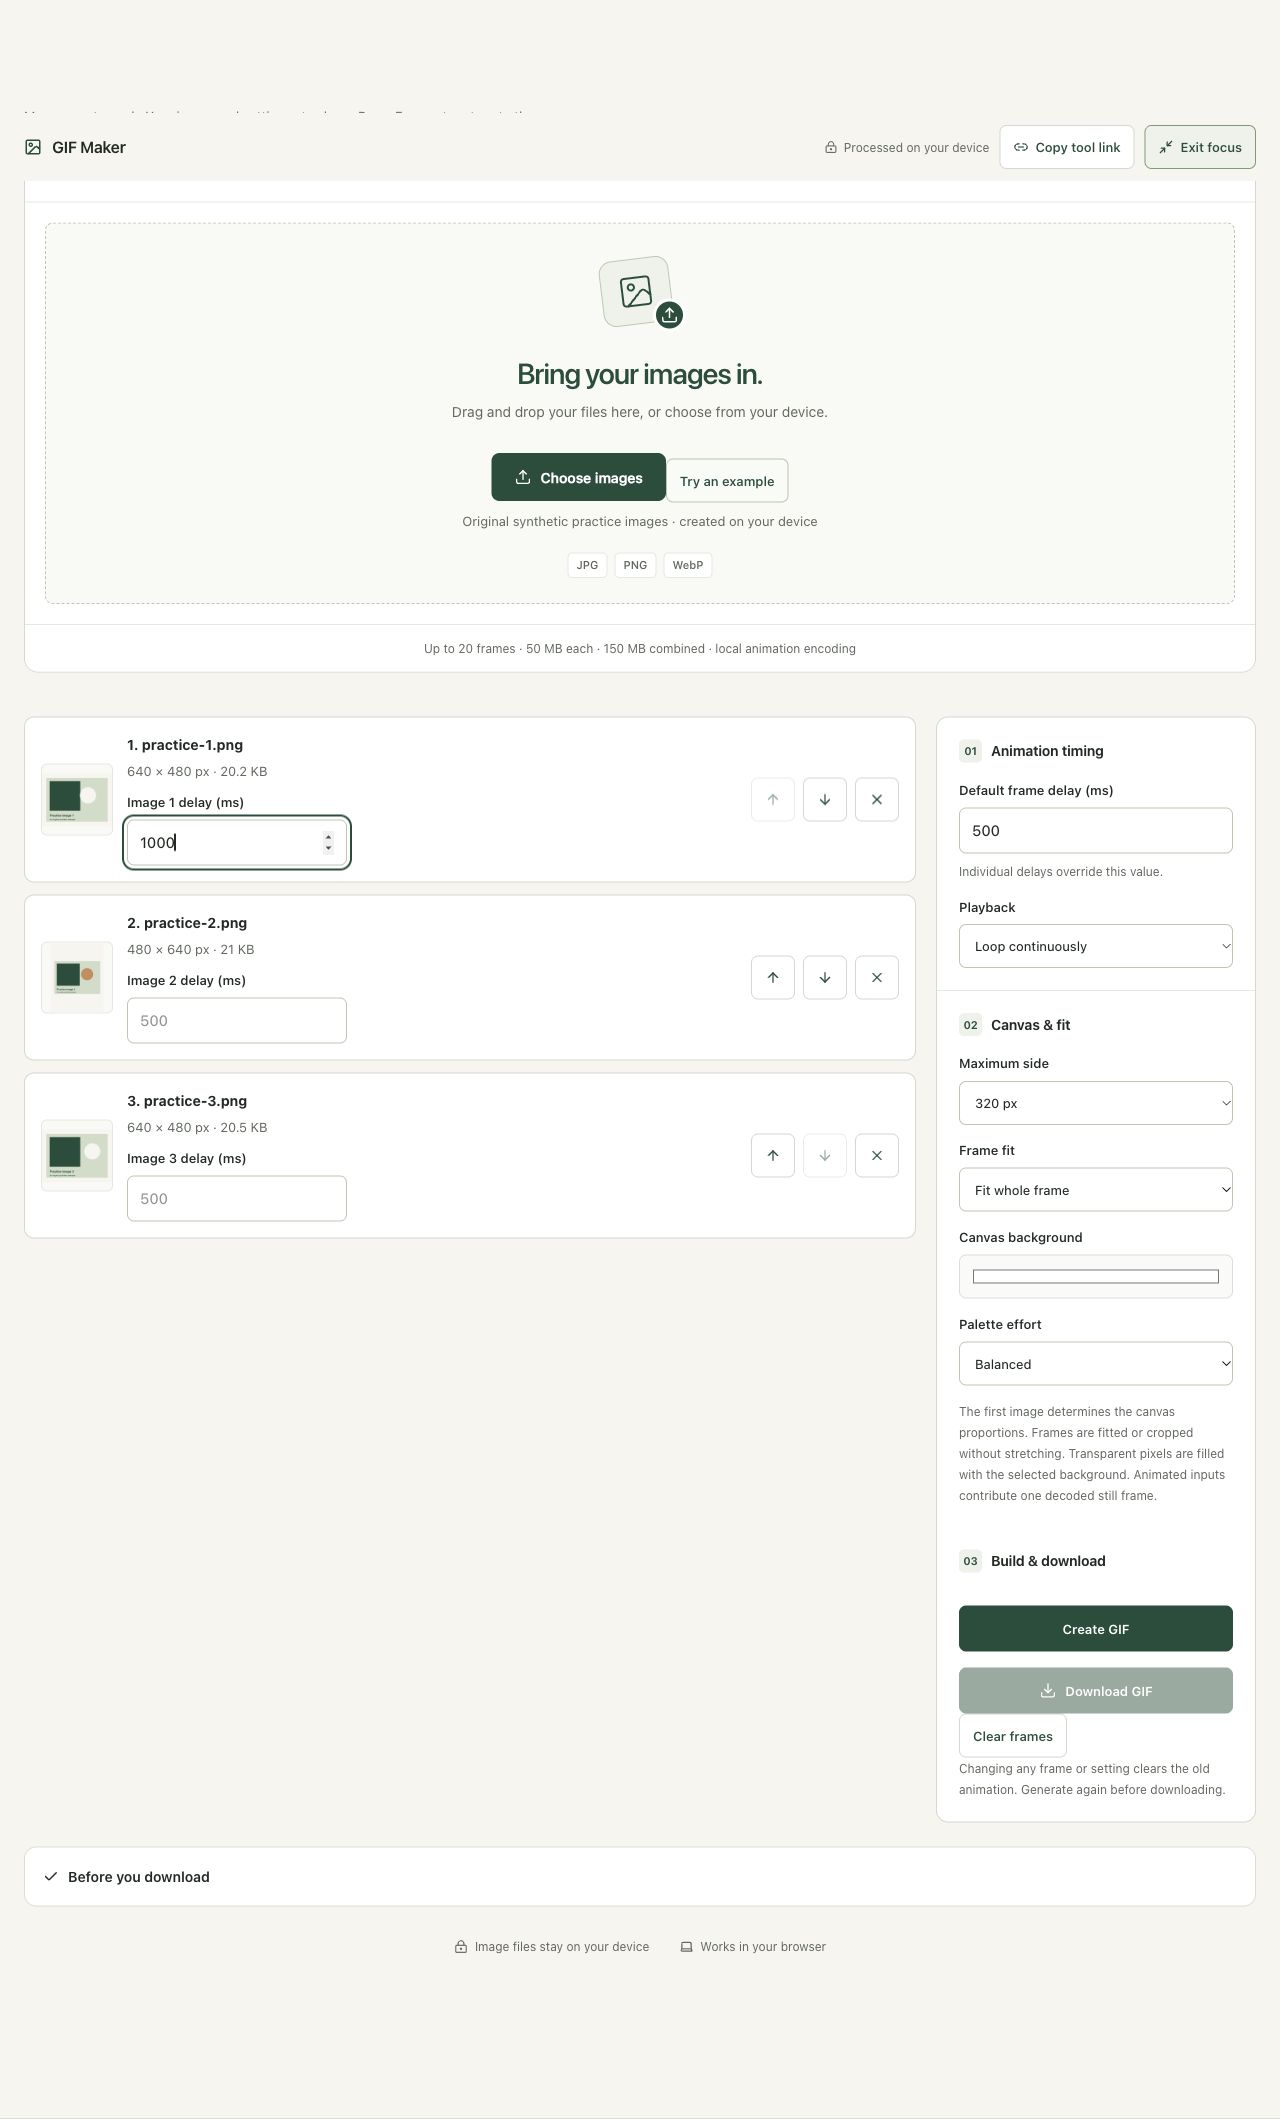
Set the first frame delay to 1,000 ms and keep 500 ms for the remaining two. Choose a 320-pixel maximum side, Fit whole frame, continuous looping and the white background. Those delays add to a two-second cycle. Fit preserves the portrait frame’s complete content; it does not stretch that frame to the landscape canvas.
Step 4: Create the GIF and watch the finished loop
Choose Create GIF and review the playback. The result is 320 × 240, 2.00 seconds per cycle and 15.6 KB. Look for unexpected padding or clipped content, and make sure the first frame returns naturally after the last. Download GIF only after this review. If you change timing or order afterward, rebuild the animation before exporting.
Check the result before using it
Review playback, frame order, duration and the portrait frame’s padding. GIF has a limited color palette; gradients can change. The first frame determines the canvas proportions, and mixed orientations must be fitted or cropped deliberately.
If the result is not what you expected
Changing a frame, delay or setting clears the old animation. Generate again. Milliseconds are not frames per second: 1,000 ms is one second per frame. Animated input contributes a decoded still frame rather than importing its entire animation.
Background and practical details
Plan what each frame communicates
Choose a short sequence with a clear beginning and end. A product demonstration might show three positions; a simple instruction might show a setting before and after a change. More frames are not automatically more informative. Avoid adding near-identical pictures just to make the animation longer.
Prepare source images with consistent framing where possible. If the subject jumps between positions because each picture has a different crop, the animation can feel unstable. Keep important text large enough to read at the intended display size. Do not use rapid flashing or rely on an animation alone to communicate essential instructions.
The workspace accepts up to 20 frames, 50 MB per file and 150 MB combined. These limits protect browser resources. A small number of very large decoded images can still require substantial memory. Resize working copies beforehand if the animation only needs a small display area.
Calculate the timing
The tool accepts delays from 100 to 10,000 milliseconds. A delay of 500 ms keeps a frame for half a second. Three delays of 500, 500 and 1,000 ms total 2,000 ms, or two seconds for one cycle. Per-image values override the default; leaving an individual field empty uses the default instead.
Loop continuously repeats the sequence. Play once requests one pass. Viewer behavior can differ, so test the downloaded GIF in the destination application. A long final delay is useful for a final state or short caption, but it does not add an audio track or create a pause control.
Choose how frames fit
The first image determines the output canvas proportions. Maximum side limits its longest dimension; the maker does not enlarge that first frame to reach the selected maximum. Other frames fit into the resulting canvas without stretching. Fit whole frame can leave space around a differently shaped image, while Fill canvas crops edges.
Canvas background fills unused space and transparent source pixels. This workflow produces a flattened animation rather than preserving source transparency. If a logo needs a specific surrounding color, select it deliberately. An animated input contributes one decoded still frame; the maker does not combine every frame from existing animations.
Understand GIF color and size tradeoffs
GIF uses a limited color palette. The MDN image format guide describes its palette and animation support. Gradients and photographs can look different after palette conversion. Inspect skin tones, shadows and fine text rather than judging the file only by its size.
Palette effort changes the encoder’s work, not a universal quality percentage. Higher effort can take longer. If the output is too large, try fewer frames or a smaller maximum side from the same originals. There is no fixed relationship between halving a dimension and the final compressed bytes. For long photographic sequences, consider whether the destination supports an appropriate video workflow instead.
Regenerate after changing settings
Changing a frame, delay or export setting clears the previous generated animation. Choose Create GIF again before downloading. Review the new cycle length, frame order, crop and displayed file size. Keep the original still images so you can make another version without using a palette-reduced GIF as the source.
Keep your original files and check the actual download. If an instruction no longer matches the workspace, send us the page URL and a description. Our editorial policy explains how we document examples and limitations.
Example sources and screenshot notes
This example uses original synthetic practice graphics created by Smart Image Tools. They are controlled fixtures, not photographic performance benchmarks.
The controls shown are from the version tested for this guide. A later interface update or a different source can change a result. Compare the displayed format, dimensions and status with the instructions, and report a mismatch with the article URL and the setting involved. Our editorial policy explains how examples and corrections are reviewed.
Find the right tool for your image.
Explore the free workspaces, read their methods and inspect your result before sharing.
Explore image tools